
Schritt für Schritt: So baust du ein Ticket-Panel – von der Nachricht im Panel-Kanal über die Willkommensnachricht bis zum Speichern.
Step by step: how to build a ticket panel – from the message in the panel channel and the welcome message to saving.
Du öffnest den Editor auf der Seite „Ticket System“ über „Panel erstellen“ oder bei einem bestehenden Panel über „Bearbeiten“.
Nichts wird automatisch gespeichert. Erst „Panel speichern“ in Schritt 6 übernimmt deine Änderungen. Verlässt du die Seite mit ungespeicherten Änderungen, fragt der Browser nach.
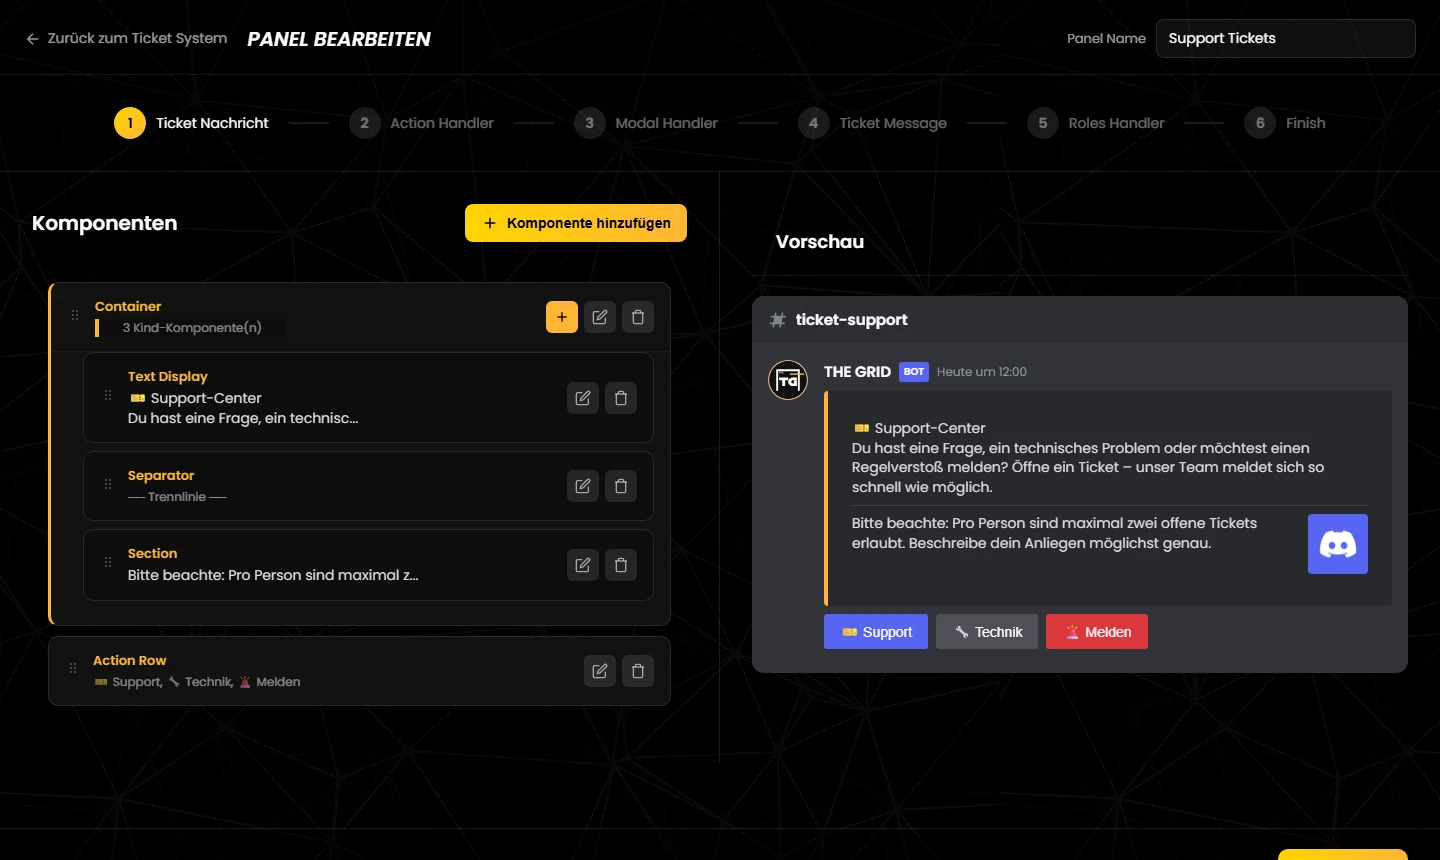
You open the editor on the “Ticket System” page with “Create Panel”, or with “Bearbeiten” (edit) on an existing panel.
Nothing is saved automatically. Only “Save Panel” in step 6 stores your changes. If you leave the page with unsaved changes, your browser asks first.
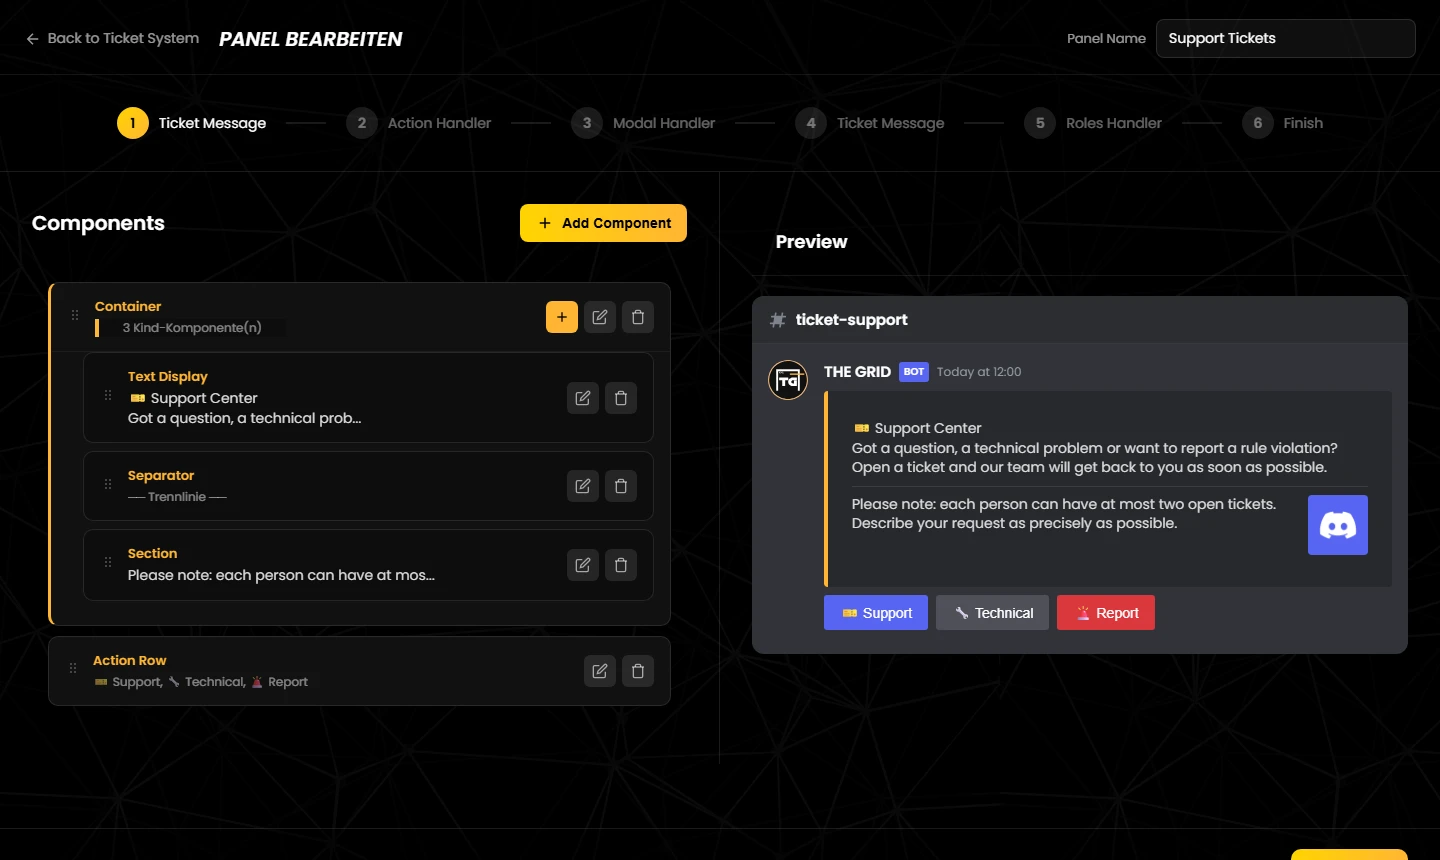
Hier baust du die Nachricht, die der Bot in den Panel-Kanal postet. Sie besteht aus Bausteinen, den Komponenten (Discord Components V2). Links steht die Liste, rechts die Vorschau.
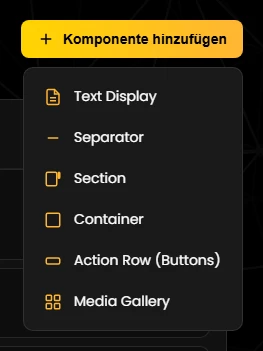
| Komponente | Wofür | Gut zu wissen |
|---|---|---|
| Text Display | Formatierter Text. Markdown wie **fett**, *kursiv*, Listen, Links und Überschriften mit # funktioniert. | Darf nicht leer sein. Discord erlaubt bis zu 4000 Zeichen pro Textblock. Die Vorschau zeigt Markdown unformatiert, in Discord erscheint es formatiert. |
| Separator | Eine Trennlinie oder nur etwas Abstand. | „Trennlinie anzeigen“ an oder aus. |
| Section | Text mit einem Zubehör rechts daneben: einem Bild (Thumbnail-URL) oder einem Button. | Das Zubehör ist Pflicht. Ein Button in einer Section öffnet Tickets wie jeder andere Button. |
| Container | Ein Rahmen um mehrere Komponenten, mit farbigem Balken links (Akzentfarbe). | Kann Text Display, Separator, Section, Action Row und Media Gallery enthalten, aber keinen weiteren Container. Inhalte fügst du über das „+“ am Container hinzu. Ein leerer Container gilt als Fehler. |
| Action Row | Die Knöpfe zum Ticket-Öffnen: bis zu 5 Buttons oder ein Auswahlmenü mit bis zu 25 Optionen. | Ohne Button oder Auswahlmenü kann niemand ein Ticket öffnen – dann lässt der Editor nicht speichern. |
| Media Gallery | Bis zu 10 Bilder, je mit Bild-URL und optionaler Beschreibung. | Bilder brauchen eine vollständige Adresse (https://…). |
„Als Spoiler anzeigen“ bei Container und Media Gallery: Discord zeigt die Inhalte erst nach einem Klick – in der Panel-Nachricht genauso wie in der Willkommensnachricht (Schritt 4).
Öffne die Action Row mit dem Stift. Unter „Typ“ wählst du zwischen Buttons und einem Auswahlmenü.
Wechselst du den Typ, ersetzt der Editor die bisherigen Buttons bzw. Optionen – ihre Einstellungen gehen verloren.
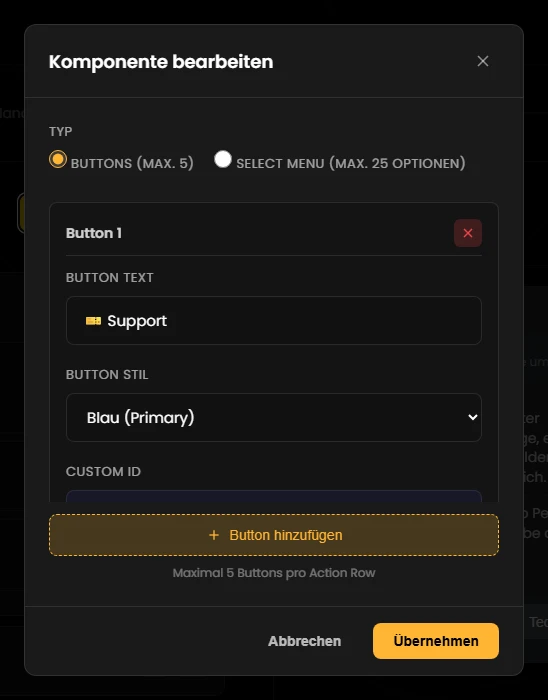
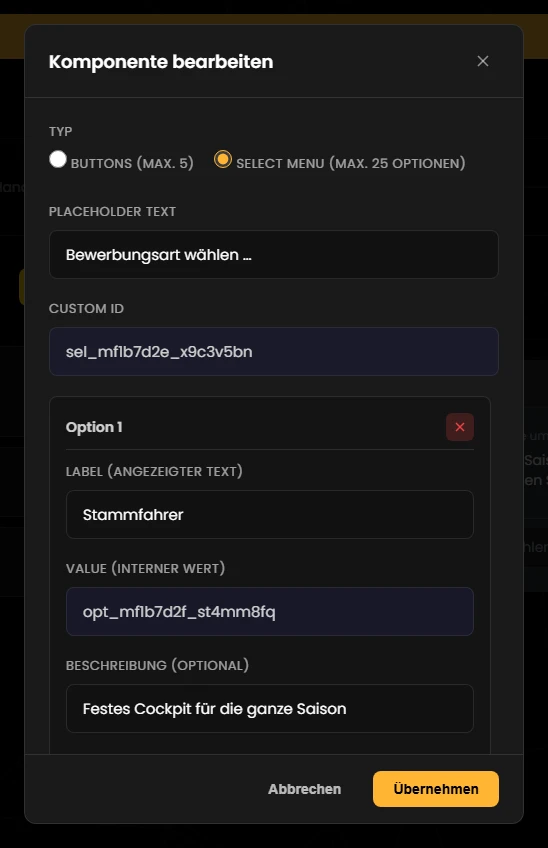
Interaktionen: Jeder Button und jede einzelne Option eines Auswahlmenüs ist eine Interaktion. In den Schritten 3, 4 und 5 richtest du Formulare, Nachrichten und Rollen-Zugriffe pro Interaktion ein. Löschst du einen Button und legst ihn neu an, bekommt er eine neue Kennung – seine Formular- und Nachrichten-Einstellungen sind dann weg.
This is where you build the message the bot posts in the panel channel. It is made of building blocks, the components (Discord Components V2). The list is on the left, the preview on the right.
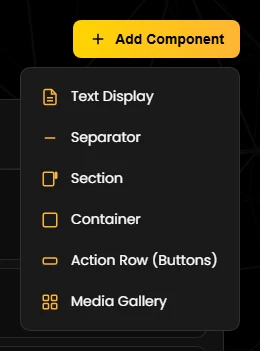
| Component | Used for | Good to know |
|---|---|---|
| Text Display | Formatted text. Markdown such as **bold**, *italic*, lists, links and headings with # works. | Must not be empty. Discord allows up to 4,000 characters per text block. The preview shows Markdown unformatted; in Discord it is formatted. |
| Separator | A divider line or just some spacing. | Divider line on or off. |
| Section | Text with an accessory next to it: an image (thumbnail URL) or a button. | The accessory is required. A button in a section opens tickets like any other button. |
| Container | A frame around several components, with a coloured bar on the left (accent colour). | Can hold Text Display, Separator, Section, Action Row and Media Gallery, but no other container. Add content with the “+” on the container. An empty container counts as an error. |
| Action Row | The buttons that open tickets: up to 5 buttons or one select menu with up to 25 options. | Without a button or select menu nobody can open a ticket – the editor will not let you save. |
| Media Gallery | Up to 10 images, each with an image URL and an optional description. | Images need a full address (https://…). |
“Als Spoiler anzeigen” (show as spoiler) on containers and media galleries: Discord only reveals the content after a click – in the panel message as well as in the welcome message (step 4).
Open the Action Row with the pencil. Under “Typ” (type) you choose between buttons and a select menu.
If you switch the type, the editor replaces the existing buttons or options – their settings are lost.
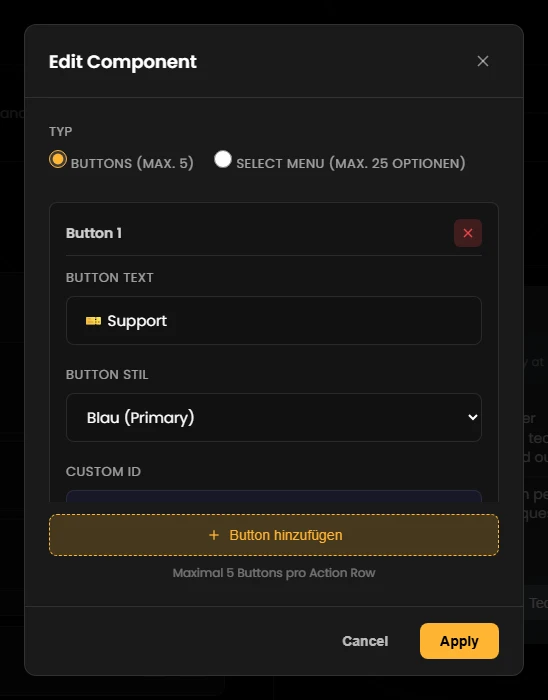
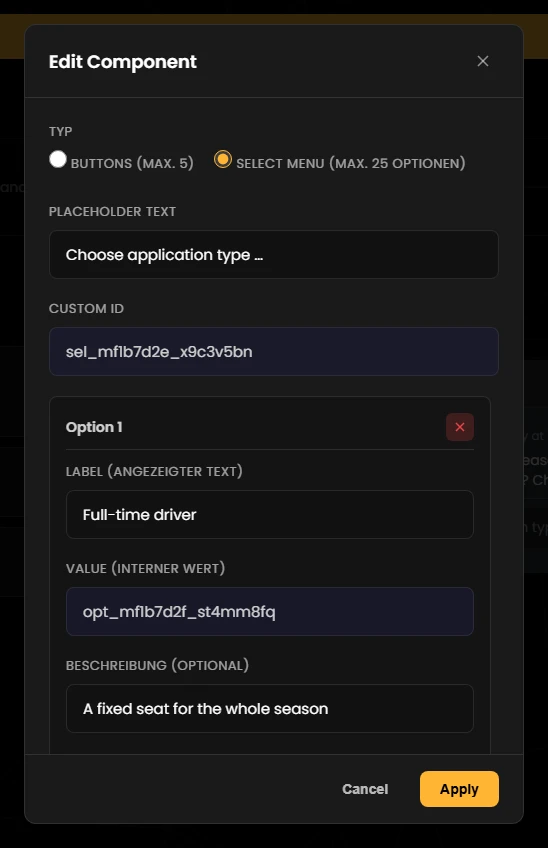
Interactions: every button and every single option of a select menu is an interaction. In steps 3, 4 and 5 you set up forms, messages and role access per interaction. If you delete a button and create it again, it gets a new ID – its form and message settings are gone.
Hier legst du fest, wo das Panel erscheint und wie Tickets angelegt werden. Die Einstellungen gelten für alle Buttons und Optionen des Panels. Rechts zeigt eine Vorschau, wie ein Ticket-Kanal heißen wird.
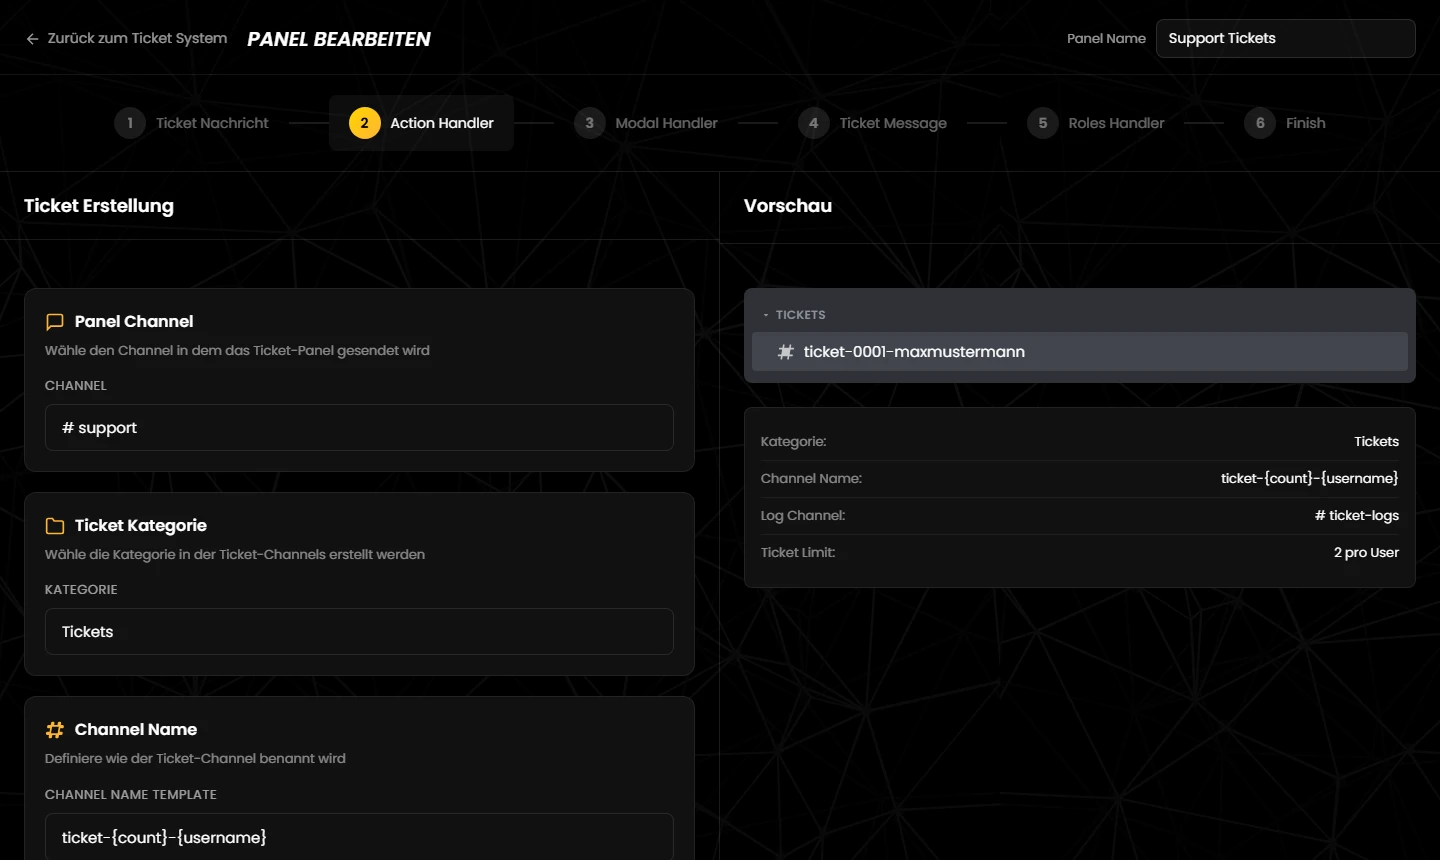
| Einstellung | Was sie bewirkt |
|---|---|
| Panel Channel Pflicht | Der Kanal, in den der Bot die Panel-Nachricht postet. Zur Auswahl stehen Text-Kanäle. Wechselst du ihn später, löscht der Bot beim Speichern die alte Nachricht und postet sie im neuen Kanal. |
| Ticket Kategorie Pflicht | Die Kategorie, in der die Ticket-Kanäle entstehen. Wird sie in Discord gelöscht, landen neue Tickets ohne Kategorie ganz oben in der Kanalliste. Ist sie voll (50 Kanäle), kann kein Ticket mehr entstehen. |
| Channel Name Template | So heißen die Ticket-Kanäle. Standard: ticket-{count}-{username}, bis zu 100 Zeichen. Die Variablen stehen weiter unten. |
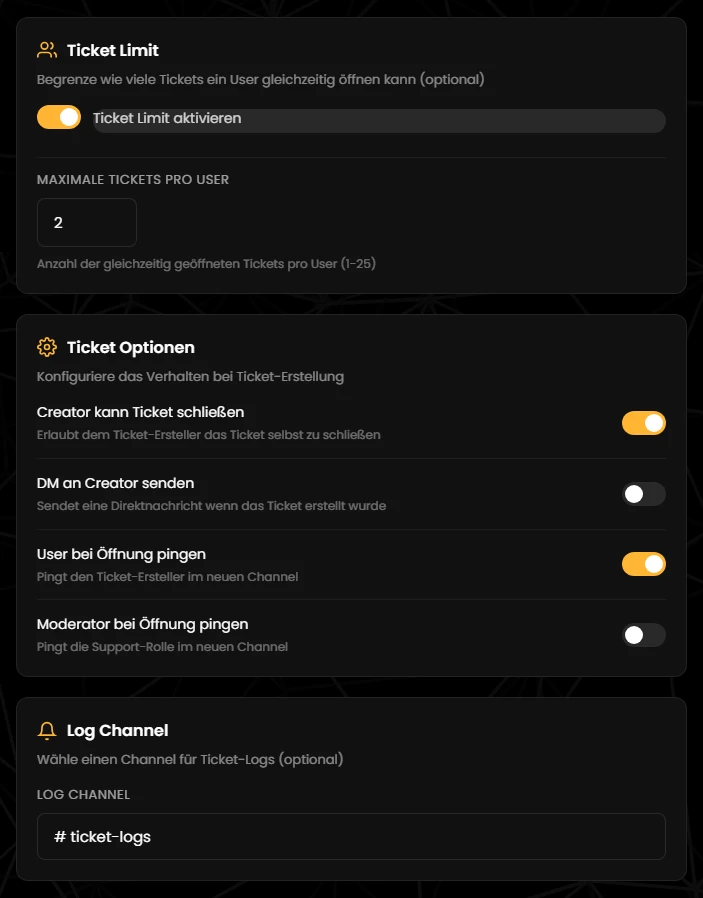
| Ticket Limit optional | Höchstzahl offener Tickets pro Mitglied in diesem Panel (1–25). Übernommene Tickets zählen mit. Der Bot prüft das beim Klick, noch bevor das Formular erscheint. |
| Log Channel optional | Kanal für die Meldungen „🎫 Neues Ticket“, „🔒 Ticket geschlossen“ und „🗑️ Ticket gelöscht (ohne Transcript)“. Übernahmen werden nicht gemeldet. Wähle einen Kanal, den nur dein Team sieht. |
| Option | Standard | Wirkung |
|---|---|---|
| Creator kann Ticket schließen | aus | Der Ersteller darf sein Ticket selbst mit „🔒 Ticket schließen“ beenden. |
| DM an Creator senden | aus | Der Bot schickt dem Ersteller eine Direktnachricht mit Servername und Link zum Ticket-Kanal. Hat jemand Direktnachrichten von Servermitgliedern abgeschaltet, entfällt sie ohne Fehlermeldung. |
| User bei Öffnung pingen | an | Die Willkommensnachricht beginnt mit einer Erwähnung des Erstellers. |
| Moderator bei Öffnung pingen | an | Der Bot erwähnt zu Beginn der Willkommensnachricht alle Support-Rollen aus Schritt 5, die für den geklickten Button bzw. die gewählte Option zuständig sind – nach dem Ersteller, wenn „User bei Öffnung pingen“ an ist. Ihre Mitglieder bekommen dadurch eine Benachrichtigung. Rollen, die es in Discord nicht mehr gibt, lässt er aus. |
Der Editor listet fünf Variablen auf. Diese vier funktionieren zusätzlich: {displayname}, {ticketnumber}, {server} und {category}.
| Variable | Wird zu | Beispiel im Kanalnamen |
|---|---|---|
{username} | Discord-Benutzername des Erstellers (nicht der Server-Spitzname) | lena_racing → lena-racing |
{displayname} | Anzeigename des Erstellers auf dem Server | Lena → lena |
{userid} | Discord-ID des Erstellers | 284716520591032320 |
{option} | Beschriftung des geklickten Buttons bzw. der gewählten Option | Stammfahrer → stammfahrer |
{count} | Ticket-Nummer des Panels, vierstellig | 0042 |
{ticketnumber} | wie {count} | 0042 |
{date} | Datum des Öffnens (Weltzeit UTC) | 2026-09-25 |
{server} | Name des Servers | pdel |
{category} | Name der Ticket-Kategorie | tickets |
So entsteht der Name:
---support.{date} nutzt die Weltzeit (UTC). Kurz nach Mitternacht deutscher Zeit steht dort noch der Vortag.Tipp: Nutze {option} nur, wenn deine Button-Texte ohne Emojis und Umlaute auskommen – sonst entstehen Namen wie ---support-0042. {user} gehört nicht in den Kanalnamen, dort wird daraus nur eine Zahlenfolge.
This is where you decide where the panel appears and how tickets are created. The settings apply to all buttons and options of the panel. On the right, a preview shows what a ticket channel will be called.
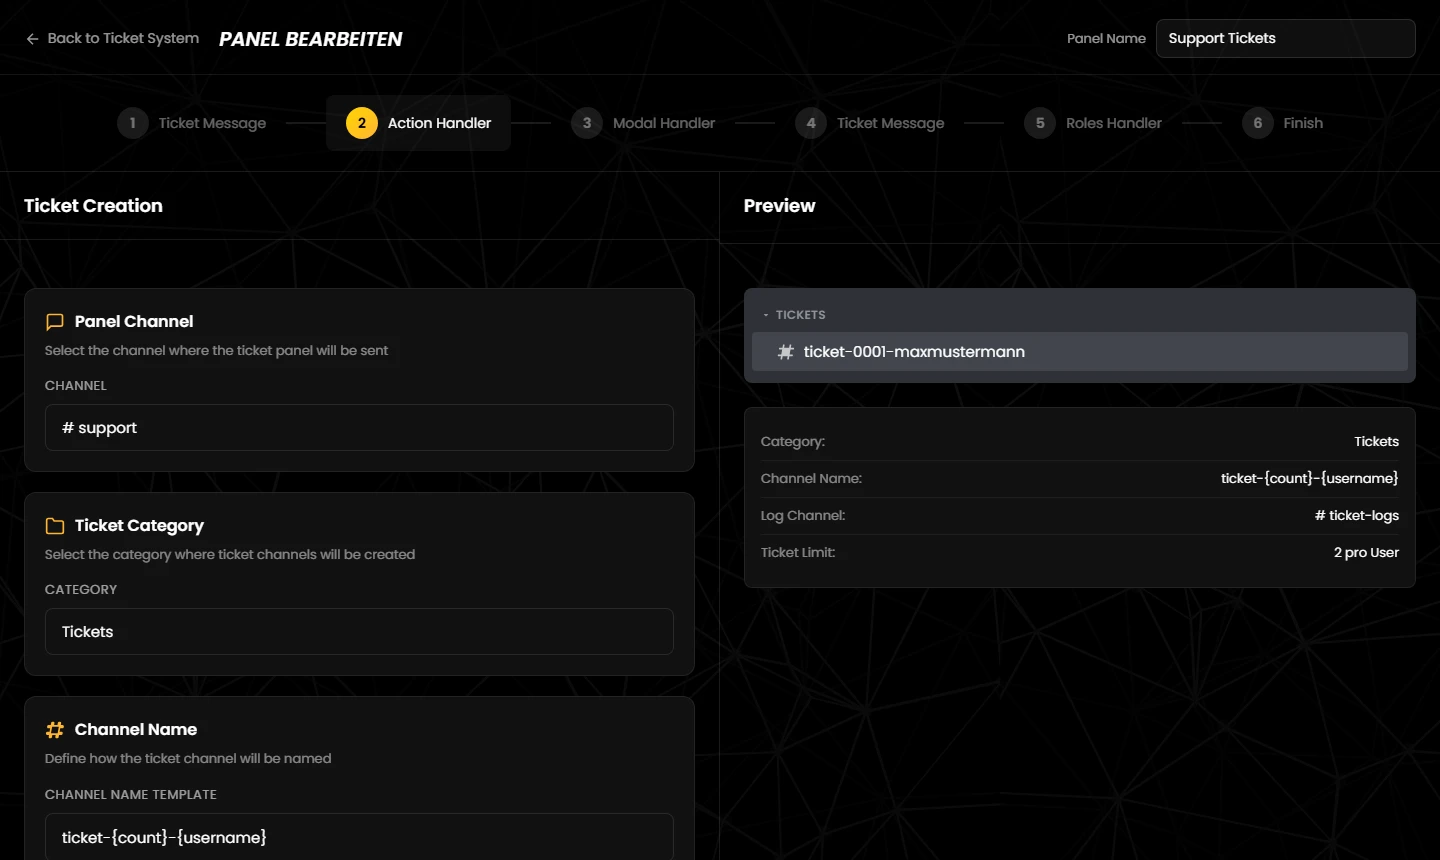
| Setting | What it does |
|---|---|
| Panel Channel required | The channel where the bot posts the panel message. You can pick text channels. If you change it later, the bot deletes the old message when you save and posts it in the new channel. |
| Ticket Category required | The category in which the ticket channels are created. If it is deleted in Discord, new tickets end up without a category at the top of the channel list. If it is full (50 channels), no more tickets can be created. |
| Channel Name Template | What the ticket channels are called. Default: ticket-{count}-{username}, up to 100 characters. The variables are listed below. |
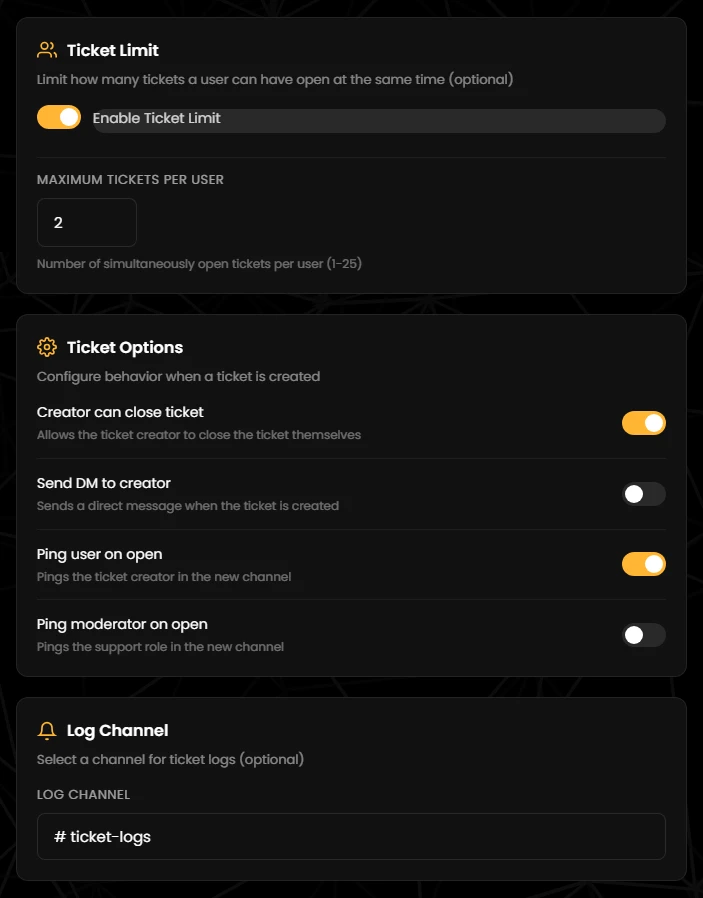
| Ticket Limit optional | Maximum number of open tickets per member in this panel (1–25). Claimed tickets count too. The bot checks it on the click, before the form appears. |
| Log Channel optional | Channel for the “🎫 New Ticket”, “🔒 Ticket Closed” and “🗑️ Ticket deleted (no transcript)” messages. Claims are not reported. Pick a channel that only your team can see. |
| Option | Default | Effect |
|---|---|---|
| Creator can close ticket | off | The creator may close their own ticket with “🔒 Close Ticket”. |
| Send DM to creator | off | The bot sends the creator a direct message with the server name and a link to the ticket channel. If someone has turned off direct messages from server members, it is skipped without an error. |
| Ping user on open | on | The welcome message starts with a mention of the creator. |
| Ping moderator on open | on | At the start of the welcome message the bot mentions every support role from step 5 that is responsible for the clicked button or chosen option – after the creator if “Ping user on open” is on. Their members get a notification. Roles that no longer exist in Discord are skipped. |
The editor lists five variables. These four work as well: {displayname}, {ticketnumber}, {server} and {category}.
| Variable | Becomes | Example in the channel name |
|---|---|---|
{username} | The creator's Discord username (not the server nickname) | lena_racing → lena-racing |
{displayname} | The creator's display name on the server | Lena → lena |
{userid} | The creator's Discord ID | 284716520591032320 |
{option} | Label of the clicked button or chosen option | Full-time driver → full-time-driver |
{count} | The panel's ticket number, four digits | 0042 |
{ticketnumber} | same as {count} | 0042 |
{date} | Date the ticket was opened (UTC) | 2026-09-25 |
{server} | Server name | pdel |
{category} | Name of the ticket category | tickets |
How the name is built:
---support.{date} uses UTC. Right after midnight in Central Europe it still shows the previous day.Tip: only use {option} if your button labels have no emojis or special characters – otherwise you get names like ---support-0042. {user} does not belong in channel names; it only turns into a string of digits there.
Für jeden Button und jede Option kannst du ein Formular einrichten, das Discord vor dem Öffnen des Tickets anzeigt. Links wählst du die Interaktion, in der Mitte baust du das Formular aus bis zu fünf Feldern, rechts siehst du die Vorschau.
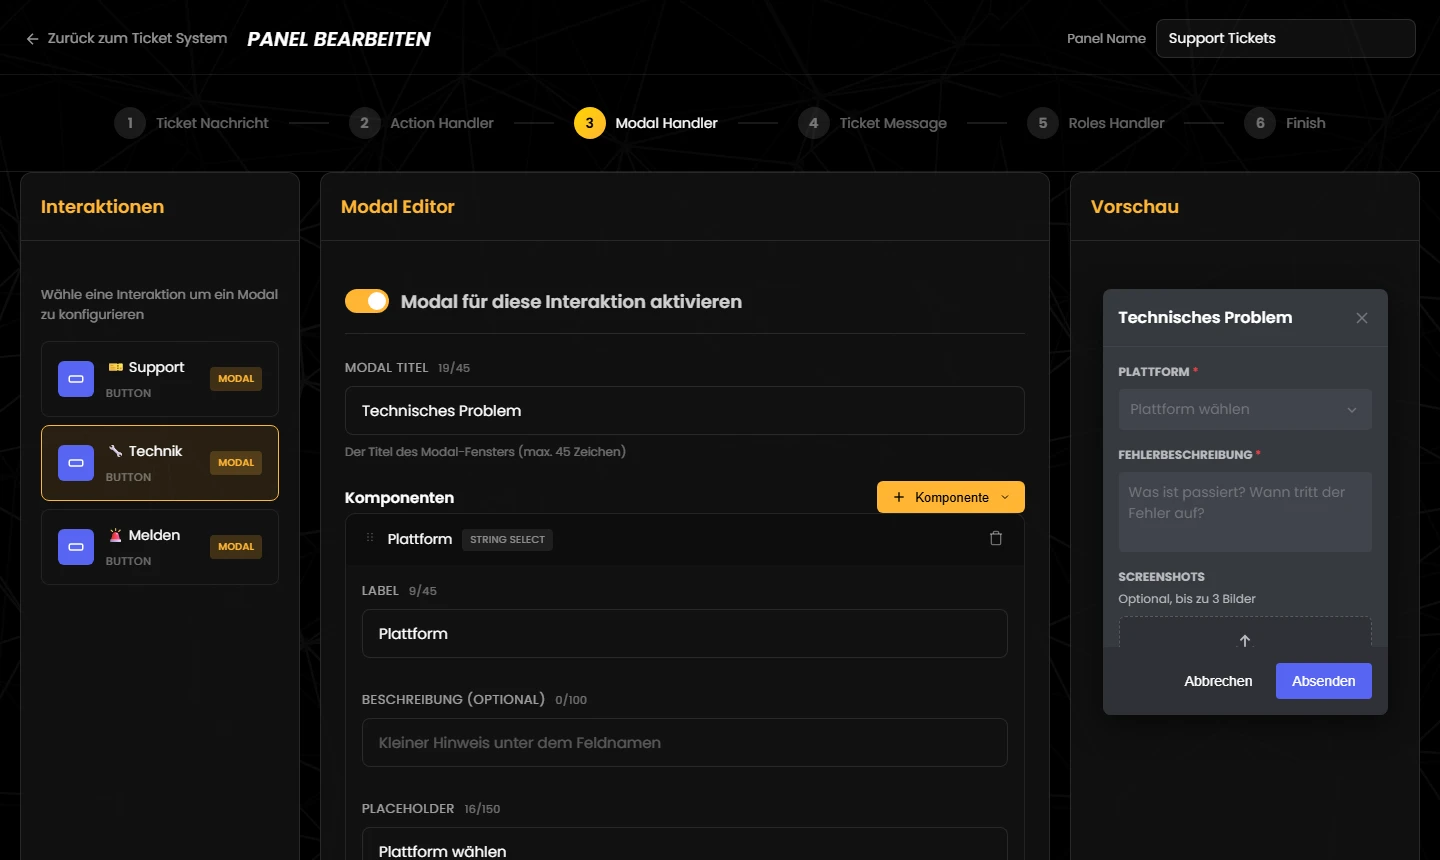
Alle zwölf Feldtypen und ihre Einstellungen erklärt die Seite Formulare (Modals).
For every button and option you can set up a form that Discord shows before the ticket is opened. Pick the interaction on the left, build the form from up to five fields in the middle and check the preview on the right.
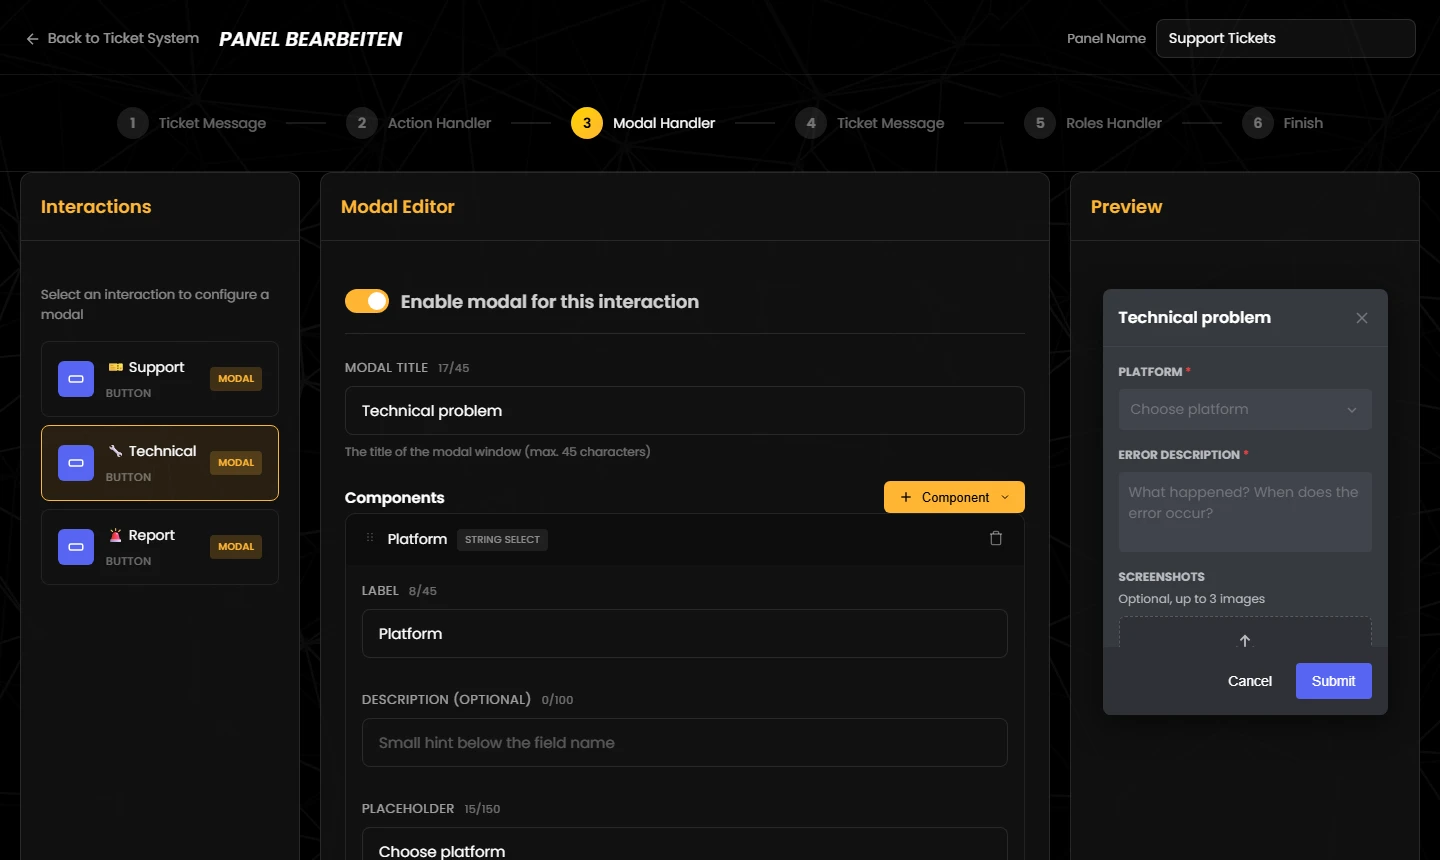
All twelve field types and their settings are explained on the Forms (modals) page.
Die Willkommensnachricht ist die erste Nachricht des Bots in jedem neuen Ticket-Kanal. Oben stellst du die Standard-Nachricht für alle Interaktionen ein, darunter auf Wunsch eigene Nachrichten für einzelne Buttons oder Optionen. Im Editor heißt der Schritt „Ticket Message“.
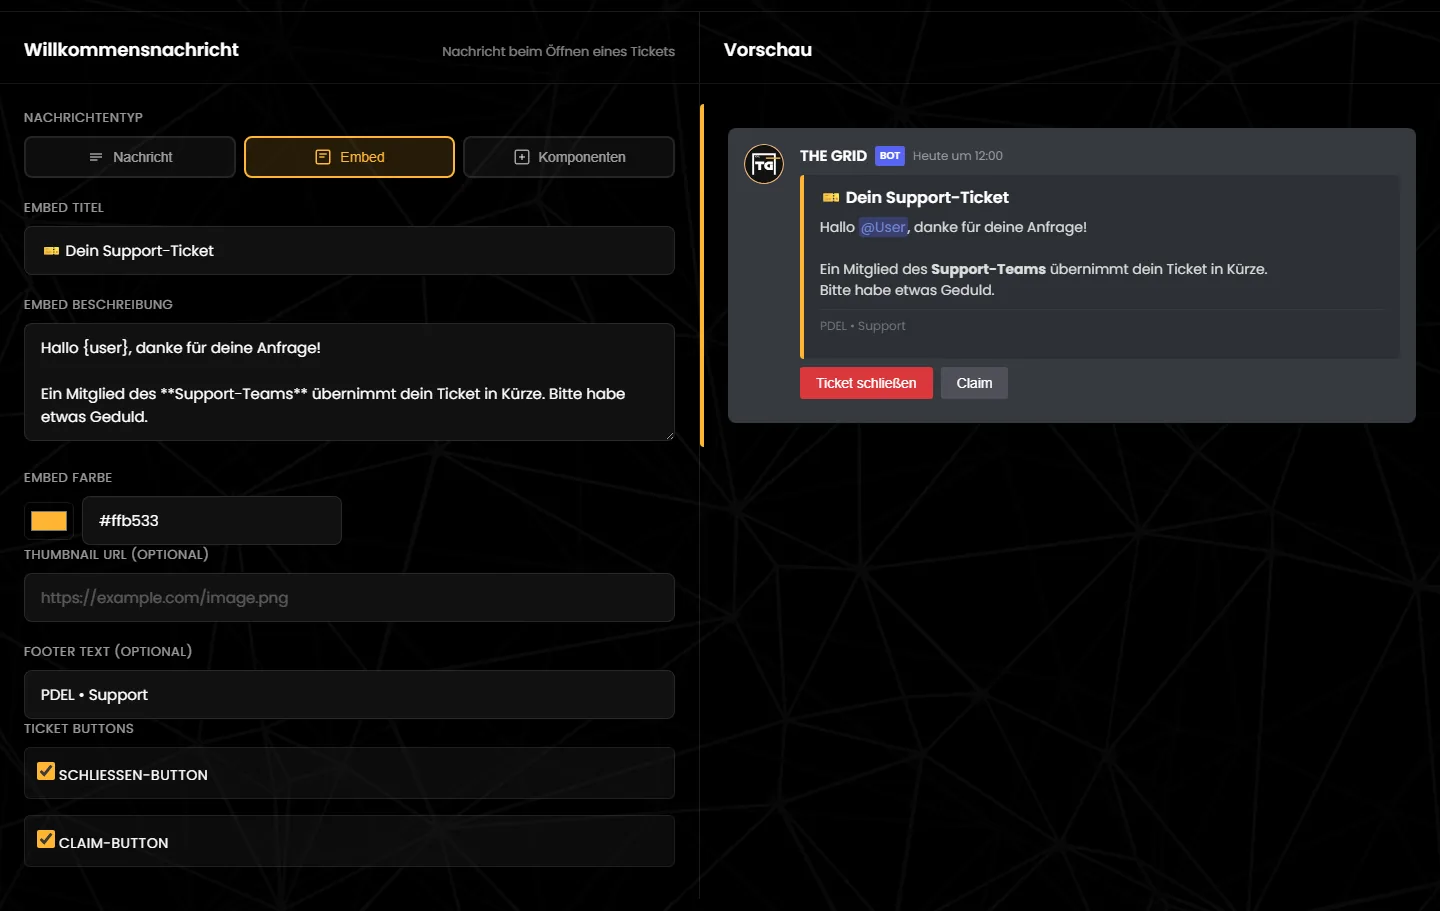
| Typ | Inhalt |
|---|---|
| Nachricht | Ein normaler Text mit Markdown und Platzhaltern. Die Vorlage „Willkommen {user}! …“ kannst du frei ändern. Texte über 2000 Zeichen teilt der Bot auf mehrere Nachrichten auf; die Buttons hängen dann an der letzten. |
| Embed | Eine Box mit Embed Titel (bis 256 Zeichen), Embed Beschreibung (bis 4096), Farbe, optionalem Thumbnail (vollständige https://-Adresse) und Footer Text (bis 2048). Platzhalter funktionieren in allen Feldern. Erwähnungen wie {user} sind nur in der Beschreibung anklickbar – im Titel und Footer nimm lieber {displayname}. |
| Komponenten | Die Bausteine aus Schritt 1, aber ohne Action Row; eine Section kann hier nur ein Bild tragen. |
„Schließen-Button“ und „Claim-Button“ sind standardmäßig an. Im Ticket erscheinen sie als „🔒 Ticket schließen“ (rot) und „✋ Ticket beanspruchen“ (blau). Die beiden Schalter gelten für alle Tickets des Panels, auch für Interaktionen mit eigener Nachricht.
Lass den Schließen-Button an. Ohne ihn kann niemand ein Ticket über den Bot schließen. Die Kanäle ließen sich dann nur noch mit /ticket delete oder von Hand löschen – ohne Transcript.
Diese Platzhalter ersetzt der Bot in der Willkommensnachricht, im Embed und in eigenen Nachrichten pro Interaktion:
| Platzhalter | Wird zu |
|---|---|
{user}, {usermention} | Erwähnung des Erstellers (@Name) |
{username} | Benutzername des Erstellers |
{displayname} | Anzeigename des Erstellers auf dem Server |
{userid} | Discord-ID des Erstellers |
{count}, {ticket-count}, {ticketnumber} | Ticket-Nummer, vierstellig (0042) |
{option} | Beschriftung des geklickten Buttons bzw. der gewählten Option |
{category} | Name der Discord-Kategorie des Tickets |
{server} | Name des Servers |
{date} | Datum im Format JJJJ-MM-TT (UTC) |
{modal:Feldname} | Antwort aus dem Formularfeld mit genau diesem Namen, zum Beispiel {modal:Betreff}. Leer, wenn das Feld nicht ausgefüllt wurde. |
Hinweis zum Editor: Unter dem Textfeld stehen „{user}, {username}, {ticket-count}, {category}“ – diese vier funktionieren. {category} ist aber der Name der Discord-Kategorie, nicht der geklickte Button; dafür gibt es {option}.
Im unteren Bereich „Nachricht pro Interaktion (optional)“ baust du für einzelne Buttons oder Optionen eine eigene Willkommensnachricht:
{modal:…} für die Felder des Formulars dieser Interaktion ein.{modal:…} selbst ein.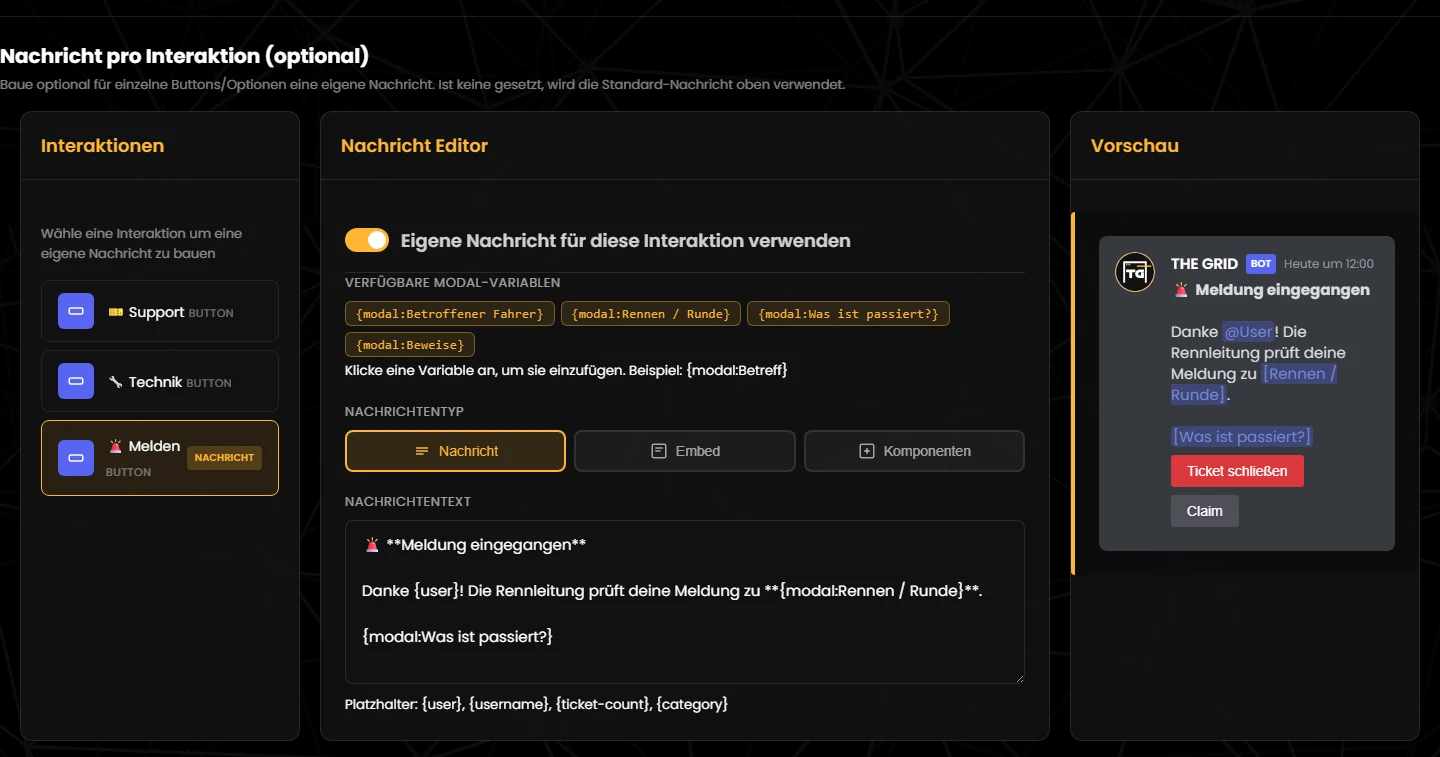
The welcome message is the bot's first message in every new ticket channel. At the top you set the default message for all interactions; below that you can add dedicated messages for individual buttons or options. In the editor this step is the second one called “Ticket Message”.
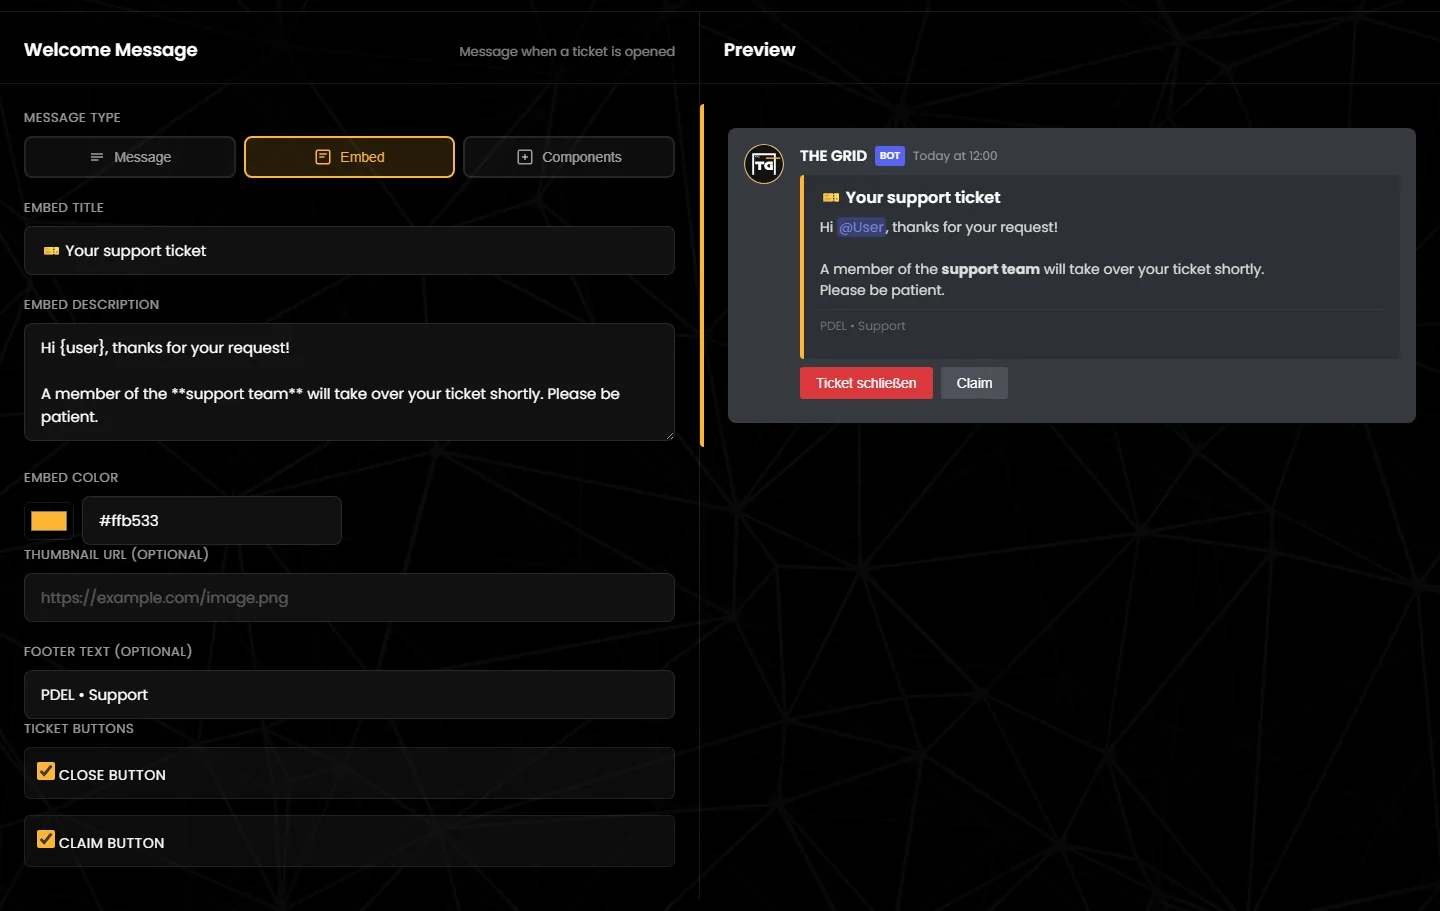
| Type | Content |
|---|---|
| Message | Plain text with Markdown and placeholders. You can change the German default text “Willkommen {user}! …” freely. Texts longer than 2,000 characters are split into several messages; the buttons go on the last one. |
| Embed | A box with Embed Title (up to 256 characters), Embed Description (up to 4,096), colour, an optional thumbnail (full https:// address) and footer text (up to 2,048). Placeholders work in every field. Mentions like {user} are only clickable in the description – use {displayname} in the title and footer. |
| Components | The building blocks from step 1, but without Action Row; a section can only carry an image here. |
“Close Button” and “Claim Button” are on by default. In the ticket they appear as “🔒 Close Ticket” (red) and “✋ Claim Ticket” (blue). The two switches apply to all tickets of the panel, including interactions with a dedicated message.
Keep the close button switched on. Without it nobody can close a ticket through the bot. The channels could then only be deleted with /ticket delete or by hand – without a transcript.
The bot replaces these placeholders in the welcome message, in the embed and in dedicated messages per interaction:
| Placeholder | Becomes |
|---|---|
{user}, {usermention} | Mention of the creator (@Name) |
{username} | The creator's username |
{displayname} | The creator's display name on the server |
{userid} | The creator's Discord ID |
{count}, {ticket-count}, {ticketnumber} | Ticket number, four digits (0042) |
{option} | Label of the clicked button or chosen option |
{category} | Name of the ticket's Discord category |
{server} | Server name |
{date} | Date as YYYY-MM-DD (UTC) |
{modal:Field name} | The answer from the form field with exactly this name, for example {modal:Subject}. Empty if the field was left blank. |
Note on the editor: the hint below the text field lists “{user}, {username}, {ticket-count}, {category}” – all four work. {category} is the name of the Discord category, though, not the clicked button; use {option} for that.
In the lower area “Message per interaction (optional)” you build a dedicated welcome message for individual buttons or options:
{modal:…} for the fields of this interaction's form.{modal:…}.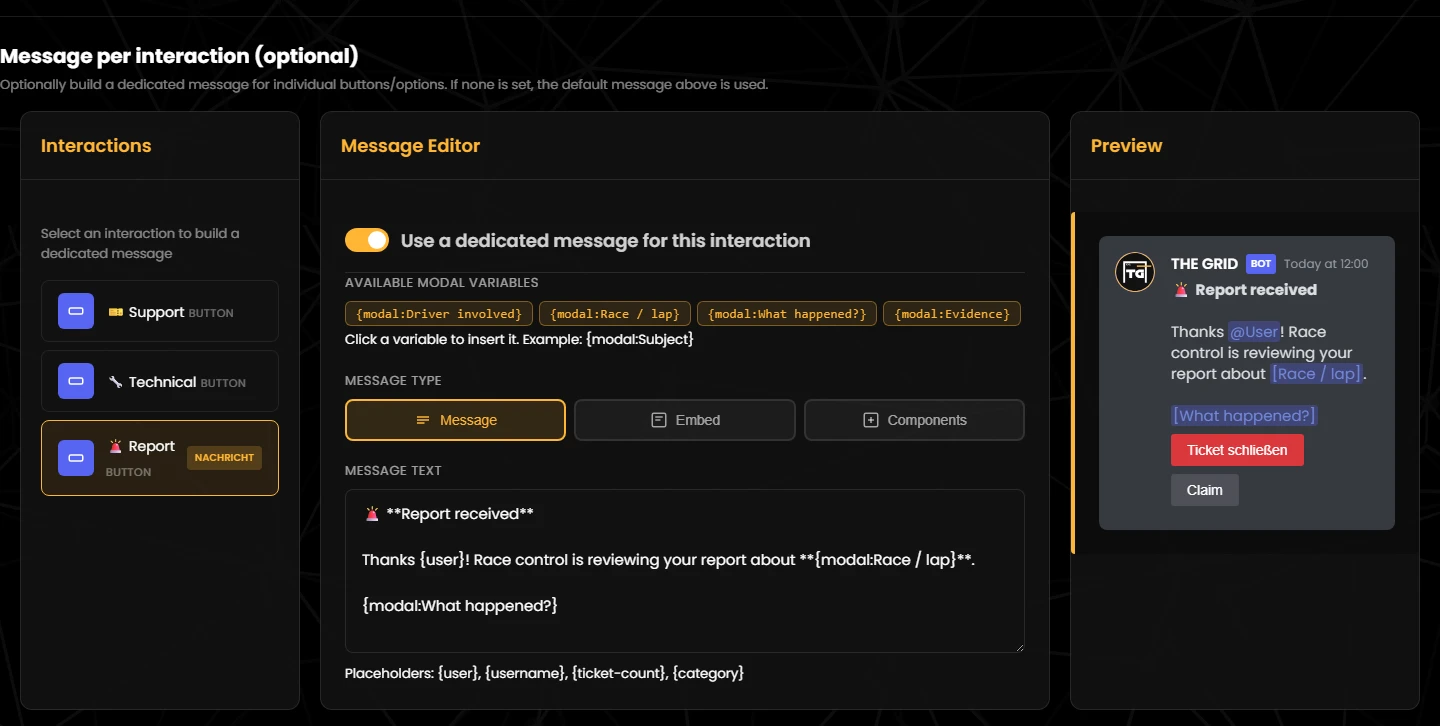
Hier trägst du die Support-Rollen ein – die Rollen, deren Mitglieder die Tickets sehen und bearbeiten. Pro Rolle legst du fest, für welche Interaktionen sie zuständig ist und was sie darf.
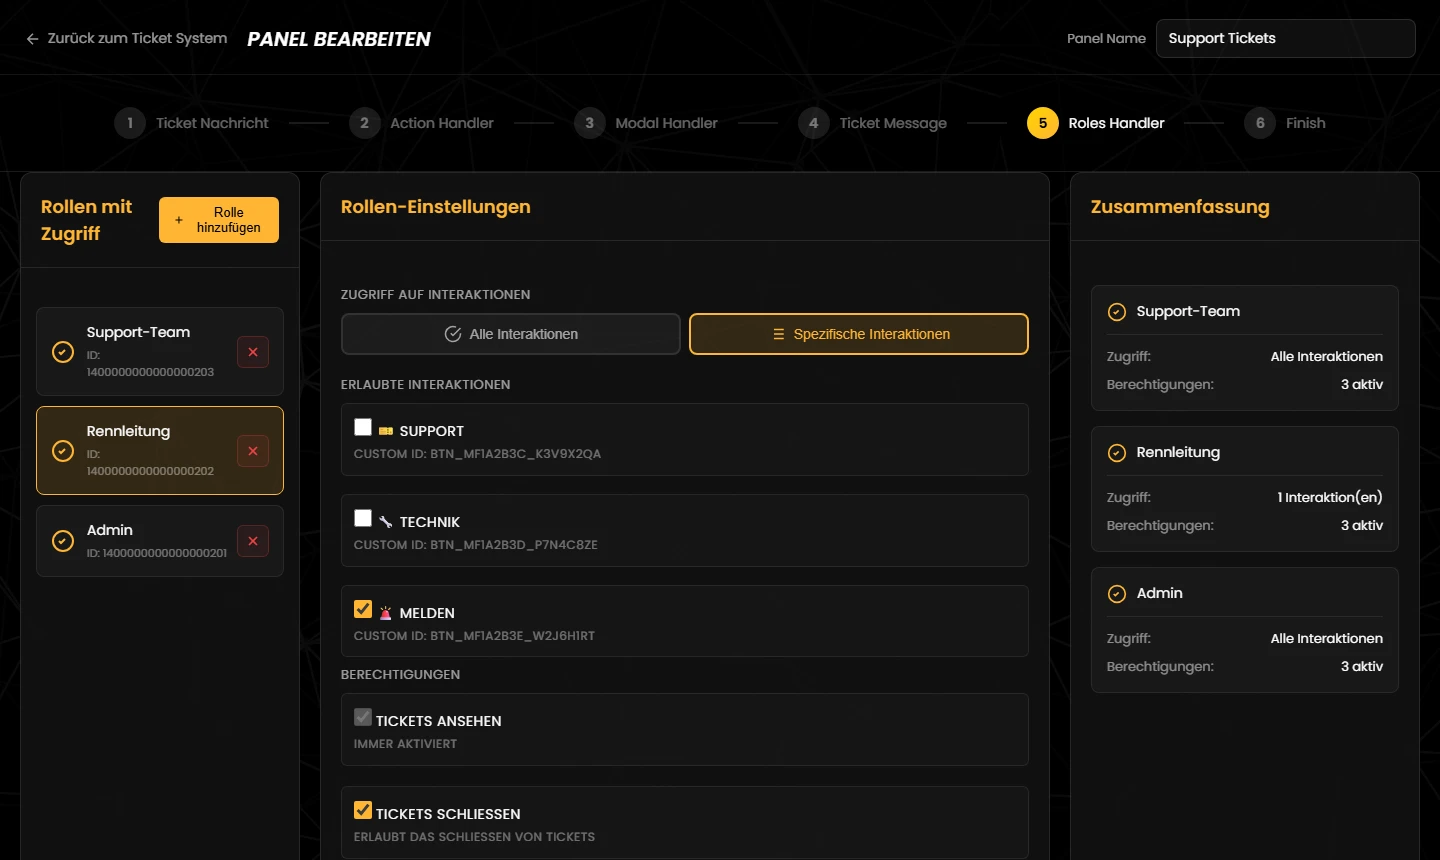
Wichtig: Bei neu hinzugefügten Rollen sind „Tickets schließen“ und „Tickets claimen“ aus. Hake beides an, sonst kann dein Team Tickets weder schließen noch übernehmen. Auch die Haken für die Befehle /ticket – „Tickets löschen“, „Tickets verwalten“ und „Transkripte erstellen“ – sind zunächst aus.
Alles zu Zugriff, Rechten und dem Dashboard-Zugang steht unter Rollen & Rechte.
This is where you add the support roles – the roles whose members see and handle the tickets. For each role you decide which interactions it is responsible for and what it may do.
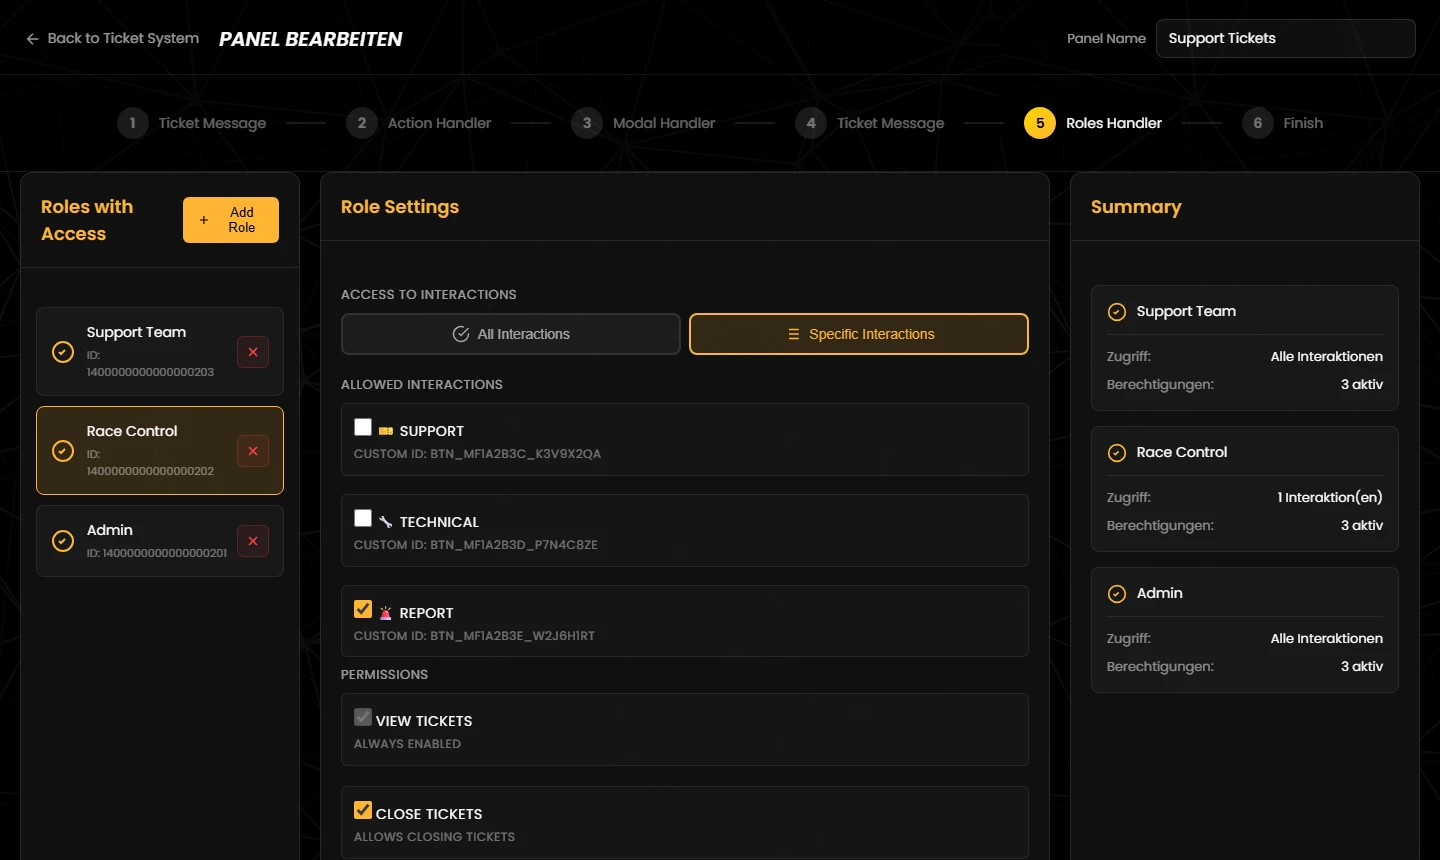
Important: for newly added roles, “Close Tickets” and “Claim Tickets” are off. Tick both, otherwise your team can neither close nor claim tickets. The ticks for the /ticket commands – “Delete Tickets”, “Manage Tickets” and “Create Transcripts” – are off at first as well.
Everything about access, permissions and dashboard access is on the Roles & permissions page.
Im letzten Schritt prüft der Editor dein Panel und fasst die Einstellungen zusammen.
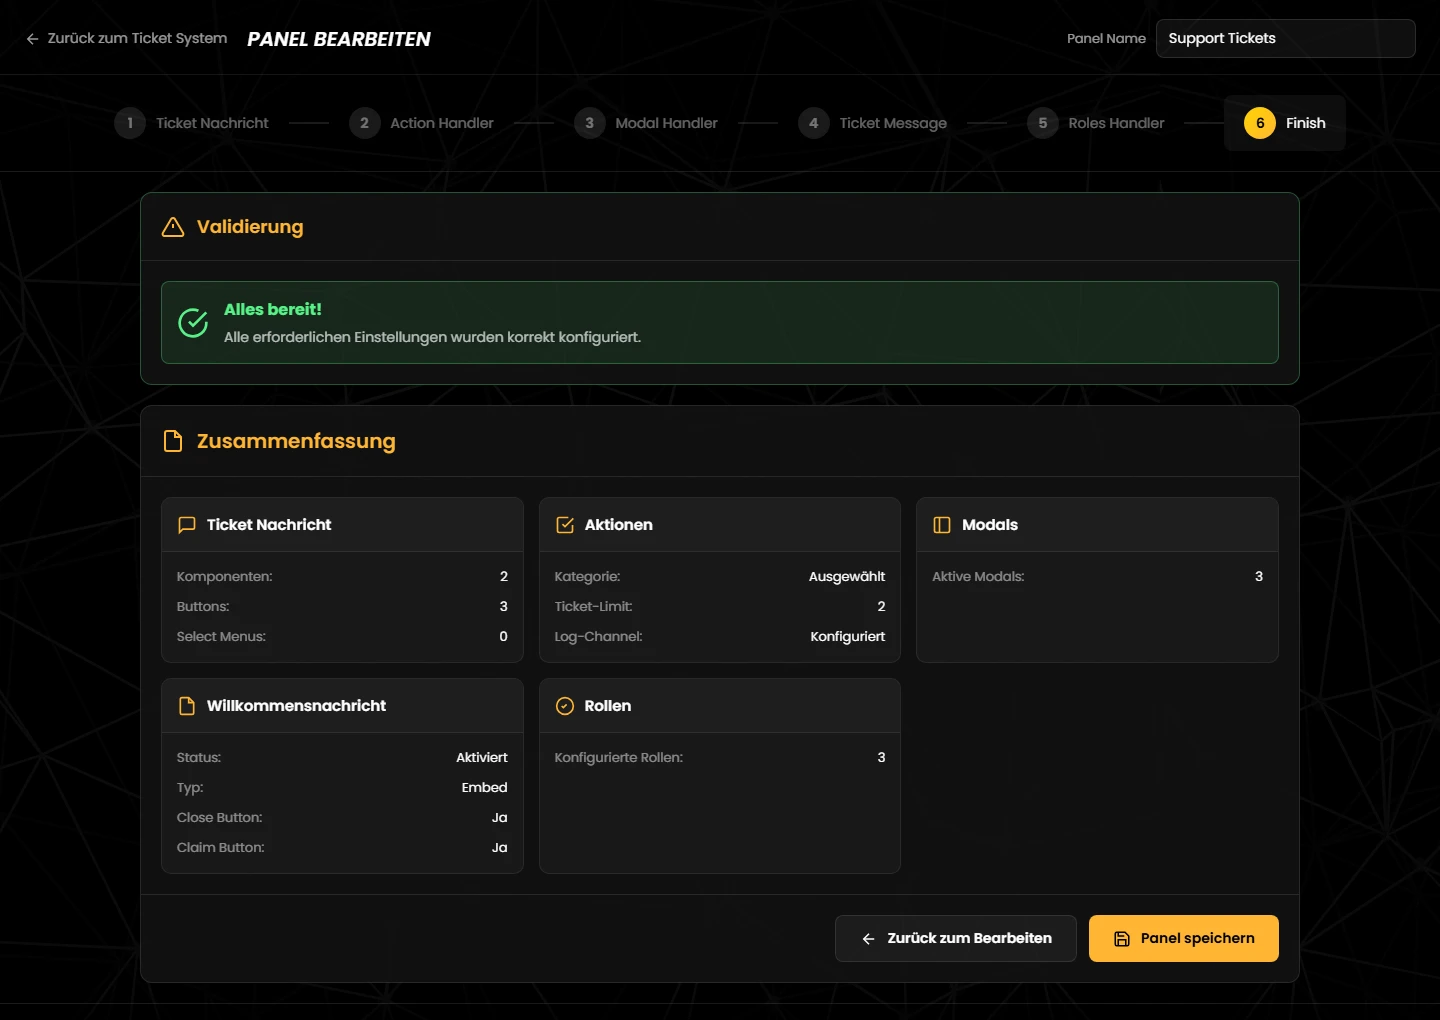
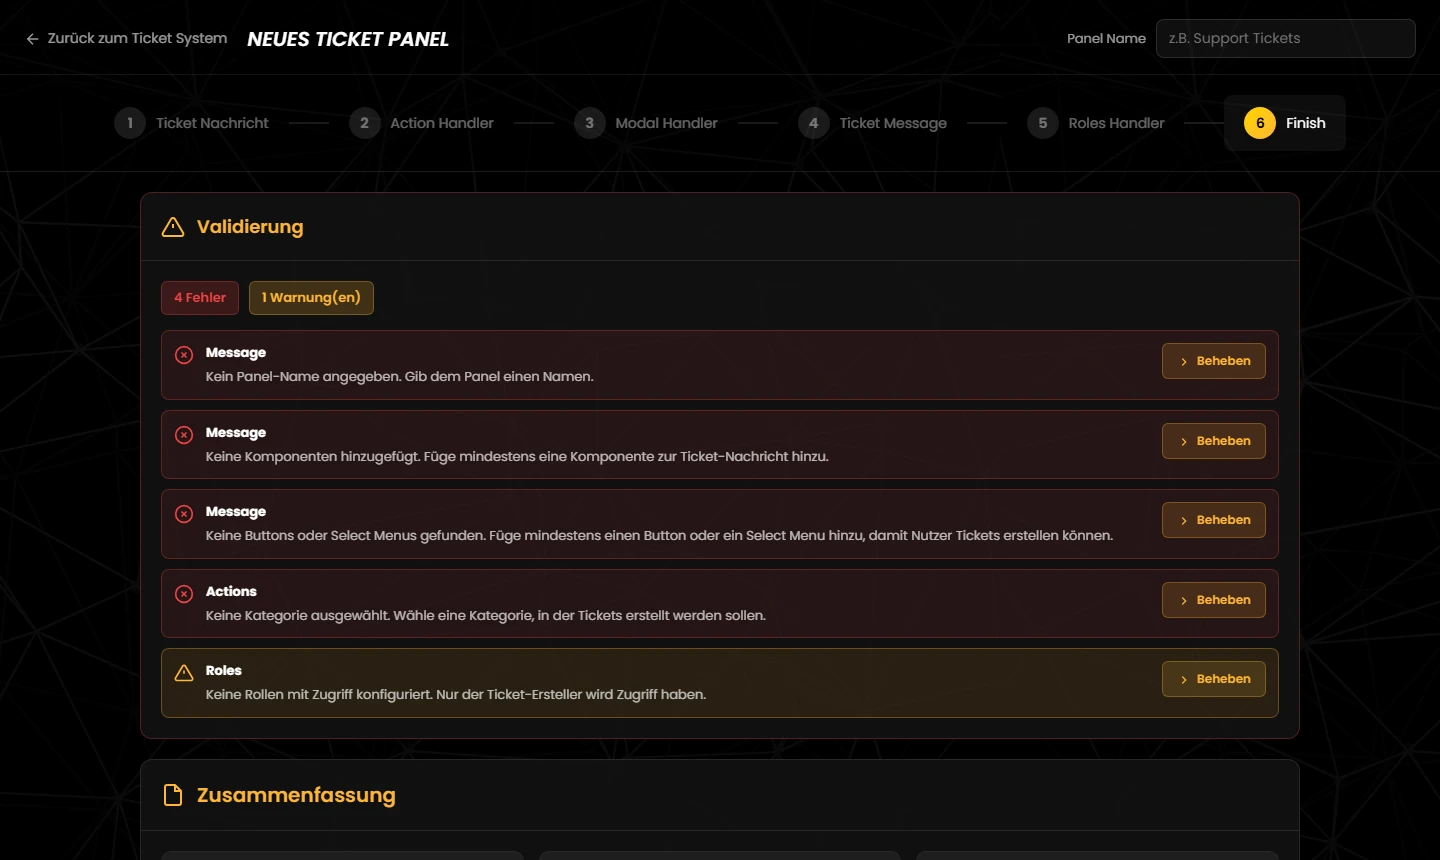
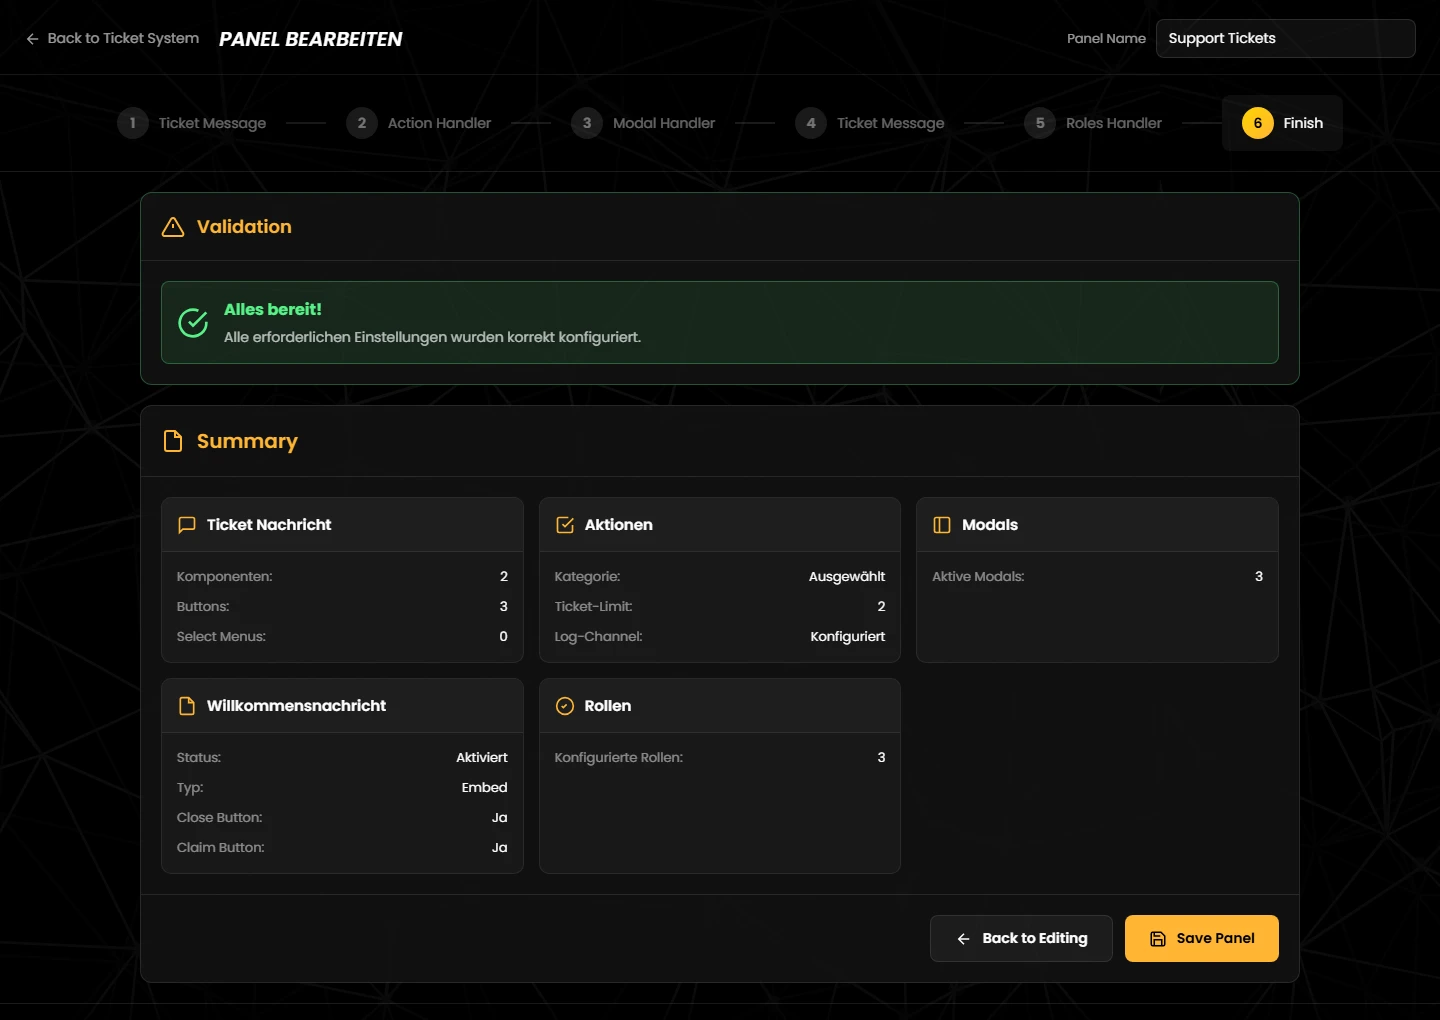
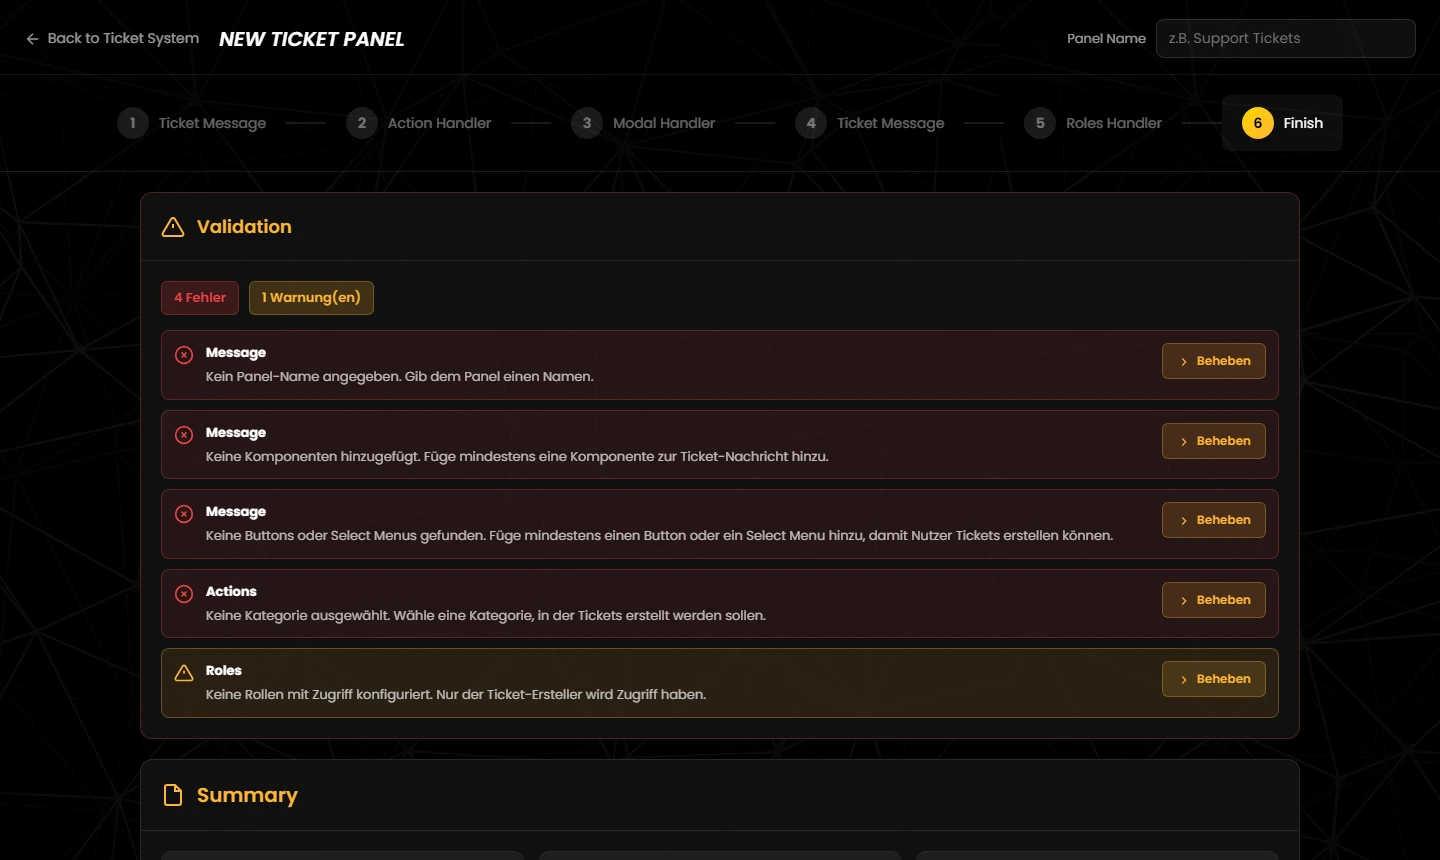
In the last step the editor checks your panel and summarises the settings. Its messages are currently shown in German.
/ticket nutzen darf, prüft der Bot dagegen immer mit den aktuellen Einstellungen./ticket commands, however, is always checked against the current settings.Tritt unserem Discord-Server bei – das Team hilft dir bei der Einrichtung gerne weiter.
Join our Discord server – the team is happy to help you with the setup.