
Begrüße jedes neue Mitglied automatisch mit einer eigenen Nachricht im Kanal deiner Wahl – gebaut aus Text, Bildern, einem farbigen Rahmen und Link-Buttons, mit Platzhaltern für Name, Server und Mitgliederzahl.
Greet every new member automatically with your own message in the channel of your choice – built from text, images, a coloured frame and link buttons, with placeholders for the name, the server and the member count.
Mit Welcome Setup begrüßt THE GRID jedes Mitglied, das deinem Server beitritt, mit einer Nachricht in einem festen Textkanal – zum Beispiel #willkommen. Wie die Nachricht aussieht, bestimmst du im Dashboard.
Die Nachricht besteht aus Bausteinen (Discord Components V2): Text, Trennlinie, Section (Text mit Bild oder Link-Button daneben), Container mit farbigem Balken, eine Reihe Link-Buttons und eine Bildergalerie. Platzhalter wie {user} oder {memberCount} ersetzt der Bot beim Senden durch echte Werte.
Klassische Embeds, freien Text außerhalb der Bausteine, Datei-Anhänge und Auswahlmenüs gibt es hier nicht. Buttons öffnen immer eine Internetadresse – Rollen per Klick vergibst du mit Reaction Roles. Welcome Setup ist in allen Tarifen ohne Begrenzung nutzbar.
With Welcome Setup, THE GRID greets every member who joins your server with a message in a fixed text channel – for example #welcome. You decide in the dashboard what the message looks like.
The message is made of building blocks (Discord Components V2): text, divider, section (text with an image or a link button next to it), container with a coloured bar, a row of link buttons and an image gallery. Placeholders such as {user} or {memberCount} are replaced with real values when the bot sends the message.
Classic embeds, free text outside the blocks, file attachments and select menus are not available here. Buttons always open a web address – to hand out roles with a click, use Reaction Roles. Welcome Setup is available in every plan without limits.
Gestalte die Begrüßung zuerst und schalte sie erst dann ein – so bekommt kein neues Mitglied eine halbfertige Nachricht.
#willkommen. Die Liste zeigt nur normale Textkanäle, ohne Kategorien – Ankündigungs-, Forum-, Sprach- und Thread-Kanäle fehlen.Wichtig – was wann gespeichert wird: Der Schalter speichert sofort beim Umlegen. Kanal und Bausteine speichert nur „Speichern“ im Editor – „Übernehmen“ im Dialog speichert nicht. Verlässt du den Editor ohne „Speichern“, sind deine Änderungen ohne Warnung weg. Umgekehrt ändert „Speichern“ im Editor den Schalter nicht.
Testen: Einen Testknopf gibt es nicht. Verlasse mit einem zweiten Discord-Konto den Server und tritt wieder bei – so siehst du die Begrüßung genau wie ein neues Mitglied. Mach das am besten nach jeder Änderung.
Design the welcome message first and only then switch it on – that way no new member gets a half-finished message.
#welcome. The list only shows regular text channels, without categories – announcement, forum, voice and thread channels are missing.Important – what is saved when: the switch saves as soon as you flip it. The channel and the blocks are only saved by “Save” in the editor – “Apply” in a dialog does not save. If you leave the editor without “Save”, your changes are lost without a warning. Conversely, “Save” in the editor does not change the switch.
Testing: there is no test button. Leave the server with a second Discord account and join again – that way you see the welcome message exactly like a new member. Ideally do this after every change.
Die Welcome-Setup-Seite zeigt auf einen Blick, ob die Begrüßung bereit ist.
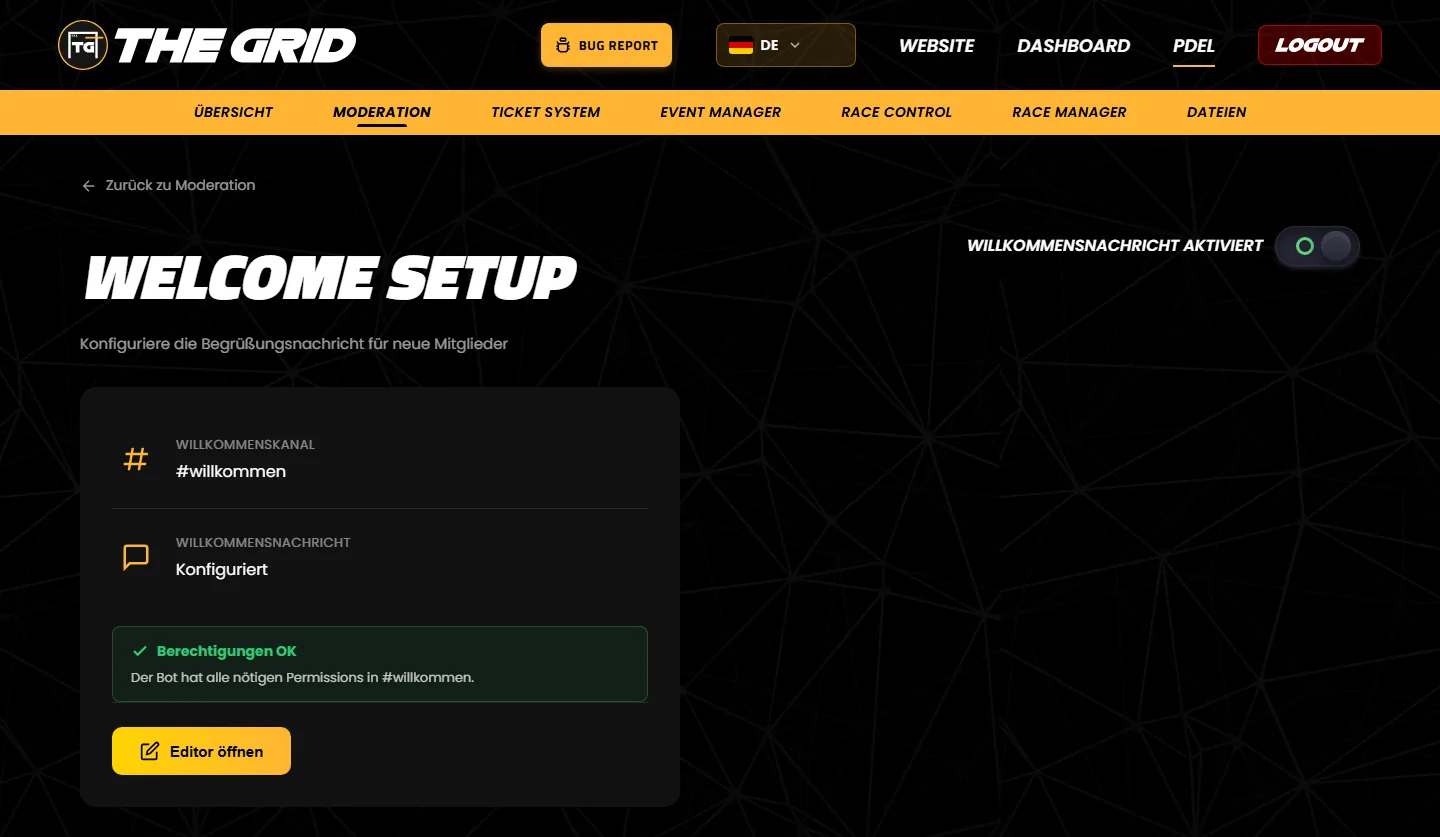
Das Banner ist derzeit nur auf Deutsch. Es wird beim Laden der Seite berechnet – legst du den Schalter um, ändert es sich erst nach dem Neuladen.
| Banner | Bedeutung | Was du tun kannst |
|---|---|---|
| Grün: „Berechtigungen OK“ – „Der Bot hat alle nötigen Permissions in #willkommen.“ | Ein Kanal ist gespeichert, und der Bot hat alle geprüften Rechte. | Nichts – alles bereit. |
| Gelb: „Kein Channel konfiguriert“ – „Die Willkommensnachricht ist aktiviert, aber es ist kein Channel ausgewählt. Öffne den Editor und wähle einen Channel.“ | Die Begrüßung ist eingeschaltet, aber kein Kanal gespeichert. Es wird nichts gesendet. | Editor öffnen, Kanal wählen, „Speichern“. |
| Rot: „Channel existiert nicht mehr“ – „Der konfigurierte Welcome-Channel wurde gelöscht. Bitte im Editor einen neuen Channel auswählen.“ | Der gespeicherte Kanal wurde in Discord gelöscht. Es wird nichts gesendet. | Editor öffnen, neuen Kanal wählen, „Speichern“. |
| Rot: „Bot fehlen Berechtigungen in #willkommen“ – „Die Welcome-Nachricht kann derzeit nicht gesendet werden. Bitte erteile dem Bot in den Channel-Berechtigungen die folgenden Permissions:“ und eine Liste | Dem Bot fehlen im Kanal Rechte. Die Liste nennt genau die fehlenden. | Rechte im Kanal erteilen – siehe Rechte. |
| Kein Banner | Die Begrüßung ist aus und kein Kanal gewählt – oder die Prüfung konnte nicht geladen werden. | – |
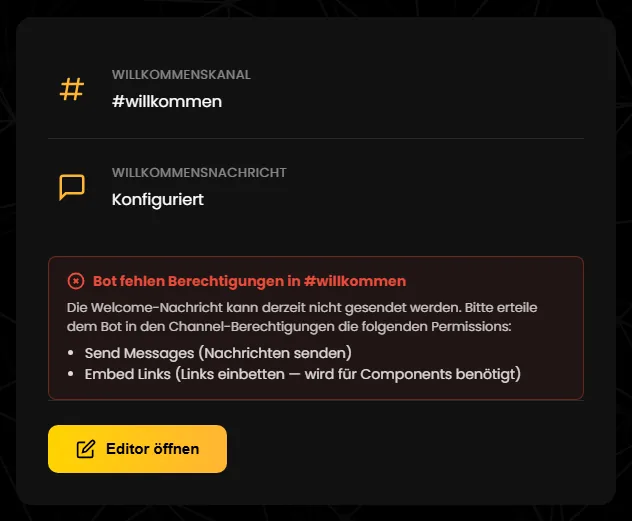
Auch die Karte „Welcome Setup“ auf der Moderationsseite trägt neben dem Titel ein Abzeichen (nur auf Deutsch). Fährst du mit der Maus darüber, erscheinen Details. Alle Abzeichen erklärt die Moderations-Übersicht.
| Abzeichen | Bedeutung |
|---|---|
| „OK“ (grün) | Der Bot kann im Willkommenskanal senden. Das Abzeichen prüft nur Kanal und Rechte – es zeigt „OK“ auch, wenn die Begrüßung ausgeschaltet ist. |
| „Kein Channel“ (gelb) | Die Begrüßung ist eingeschaltet, aber kein Kanal gespeichert. |
| „Channel fehlt“ (rot) | Der gespeicherte Kanal wurde gelöscht. |
| „Berechtigung fehlt“ (rot) | Dem Bot fehlen Rechte im Kanal; der Hinweis beim Darüberfahren nennt sie. |
Tipp: Hast du gerade Rechte geändert oder einen Kanal angelegt, kann es ein paar Minuten dauern, bis Banner und Abzeichen das zeigen. Lade die Seite danach neu.
The Welcome Setup page shows at a glance whether your welcome message is ready. The permission banner and the badges are currently only shown in German – their meaning is translated below.
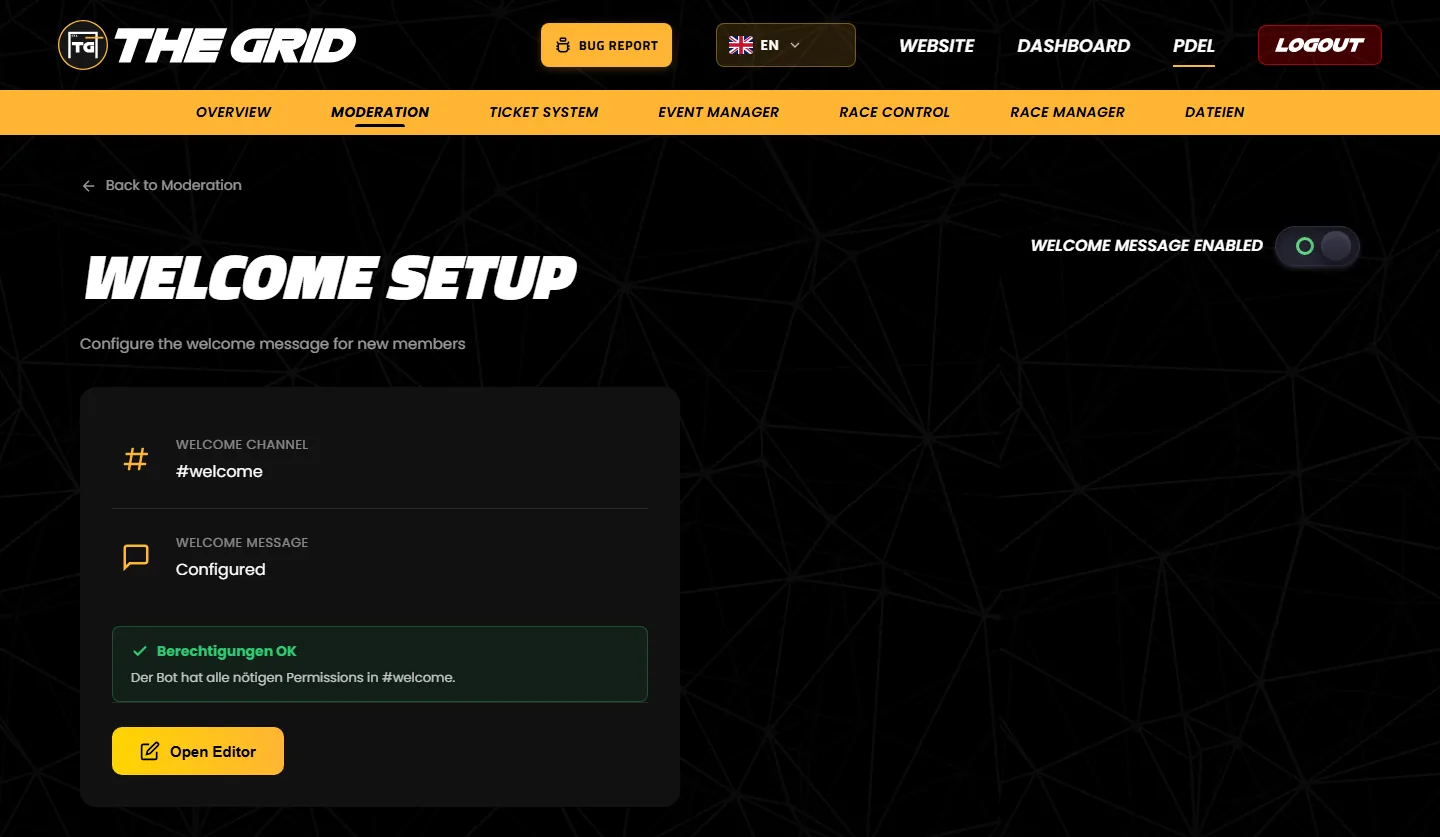
The banner is calculated when the page loads – if you flip the switch, it only changes after a reload.
| Banner | Meaning | What you can do |
|---|---|---|
| Green: “Berechtigungen OK” – “Der Bot hat alle nötigen Permissions in #welcome.” (Permissions OK – the bot has all required permissions in #welcome.) | A channel is saved and the bot has all checked permissions. | Nothing – all set. |
| Yellow: “Kein Channel konfiguriert” – “Die Willkommensnachricht ist aktiviert, aber es ist kein Channel ausgewählt. Öffne den Editor und wähle einen Channel.” (No channel configured – the welcome message is enabled, but no channel is selected. Open the editor and choose a channel.) | The welcome message is switched on, but no channel is saved. Nothing is sent. | Open the editor, choose a channel, “Save”. |
| Red: “Channel existiert nicht mehr” – “Der konfigurierte Welcome-Channel wurde gelöscht. Bitte im Editor einen neuen Channel auswählen.” (Channel no longer exists – the configured welcome channel was deleted. Please choose a new channel in the editor.) | The saved channel was deleted in Discord. Nothing is sent. | Open the editor, choose a new channel, “Save”. |
| Red: “Bot fehlen Berechtigungen in #welcome” – “Die Welcome-Nachricht kann derzeit nicht gesendet werden. Bitte erteile dem Bot in den Channel-Berechtigungen die folgenden Permissions:” and a list (Bot is missing permissions in #welcome – the welcome message cannot be sent at the moment. Please grant the bot the following permissions in the channel permissions:) | The bot is missing permissions in the channel. The list names exactly the missing ones. | Grant the permissions in the channel – see Permissions. |
| No banner | The welcome message is off and no channel is set – or the check could not be loaded. | – |
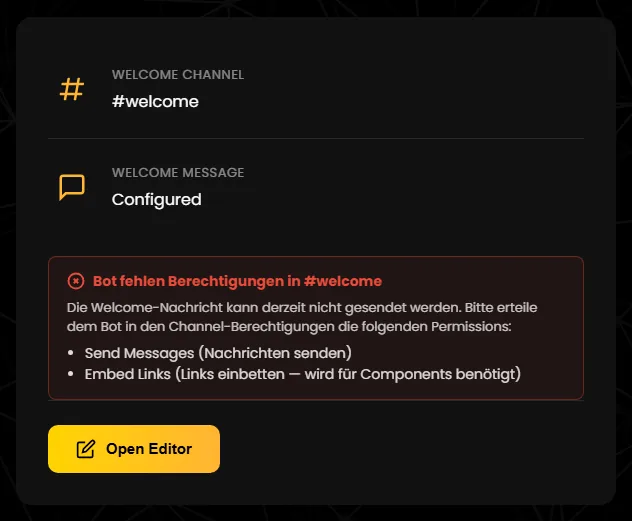
The “Welcome Setup” card on the moderation page also shows a badge next to its title (German only). Hover over it for details. All badges are explained in the moderation overview.
| Badge | Meaning |
|---|---|
| “OK” (green) | The bot can post in the welcome channel. The badge only checks channel and permissions – it also shows “OK” when the welcome message is switched off. |
| “Kein Channel” (no channel, yellow) | The welcome message is switched on, but no channel is saved. |
| “Channel fehlt” (channel missing, red) | The saved channel was deleted. |
| “Berechtigung fehlt” (permission missing, red) | The bot is missing permissions in the channel; the hover text names them. |
Tip: if you have just changed permissions or created a channel, it can take a few minutes until the banner and the badge show it. Reload the page afterwards.
Im Editor baust du die Begrüßung und wählst den Kanal. Du erreichst ihn über „Editor öffnen“ auf der Welcome-Setup-Seite.
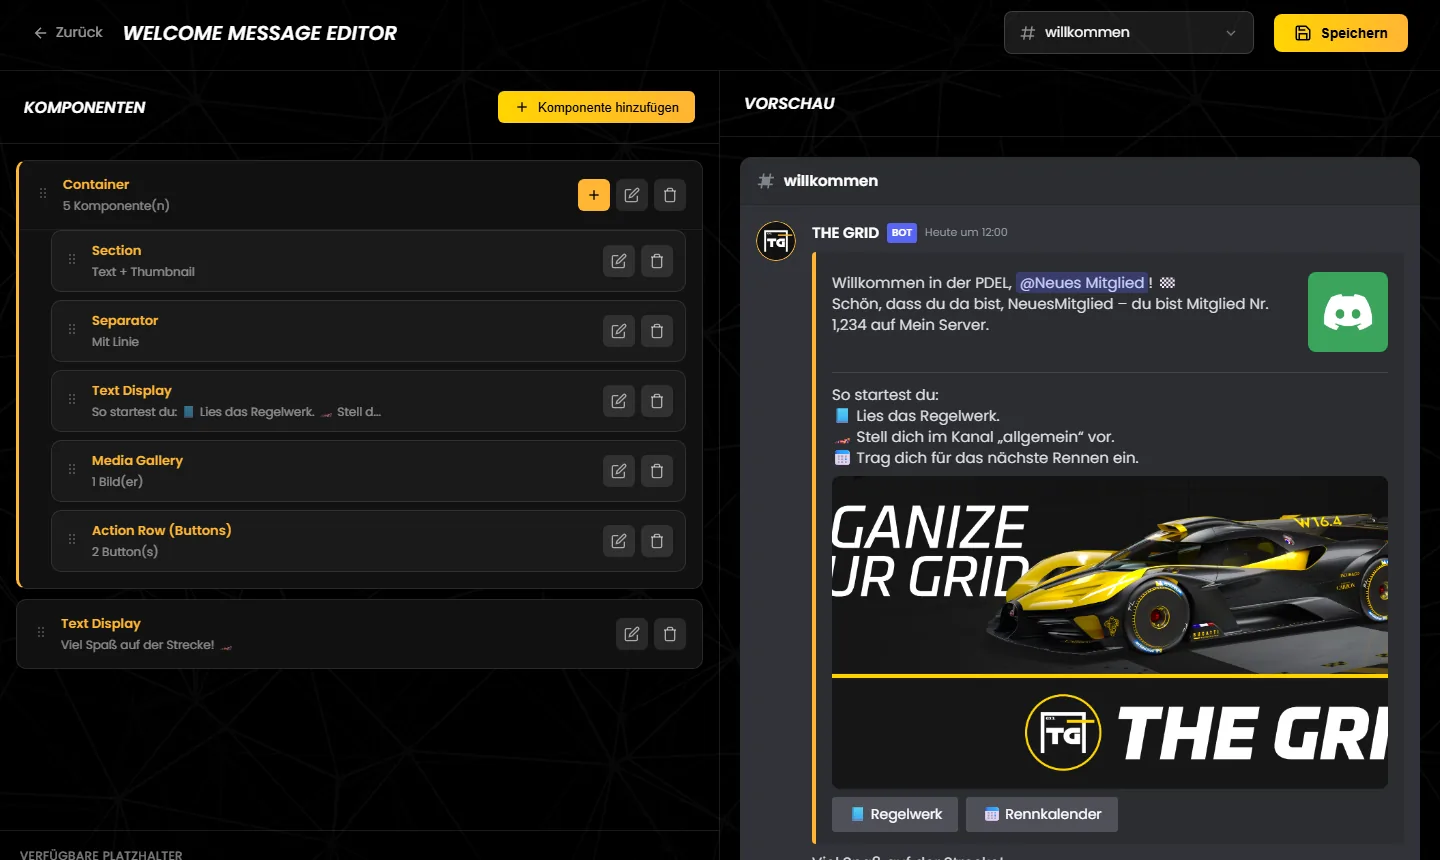
Die Vorschau hilft beim Gestalten, zeigt aber nicht alles so wie Discord:
**fett** erscheint roh. In Discord ist der Text formatiert.{userAvatar} im Text erscheint als kleines Bild – in Discord ist es nur ein Link.In the editor you build the welcome message and choose the channel. You reach it with “Open Editor” on the Welcome Setup page.
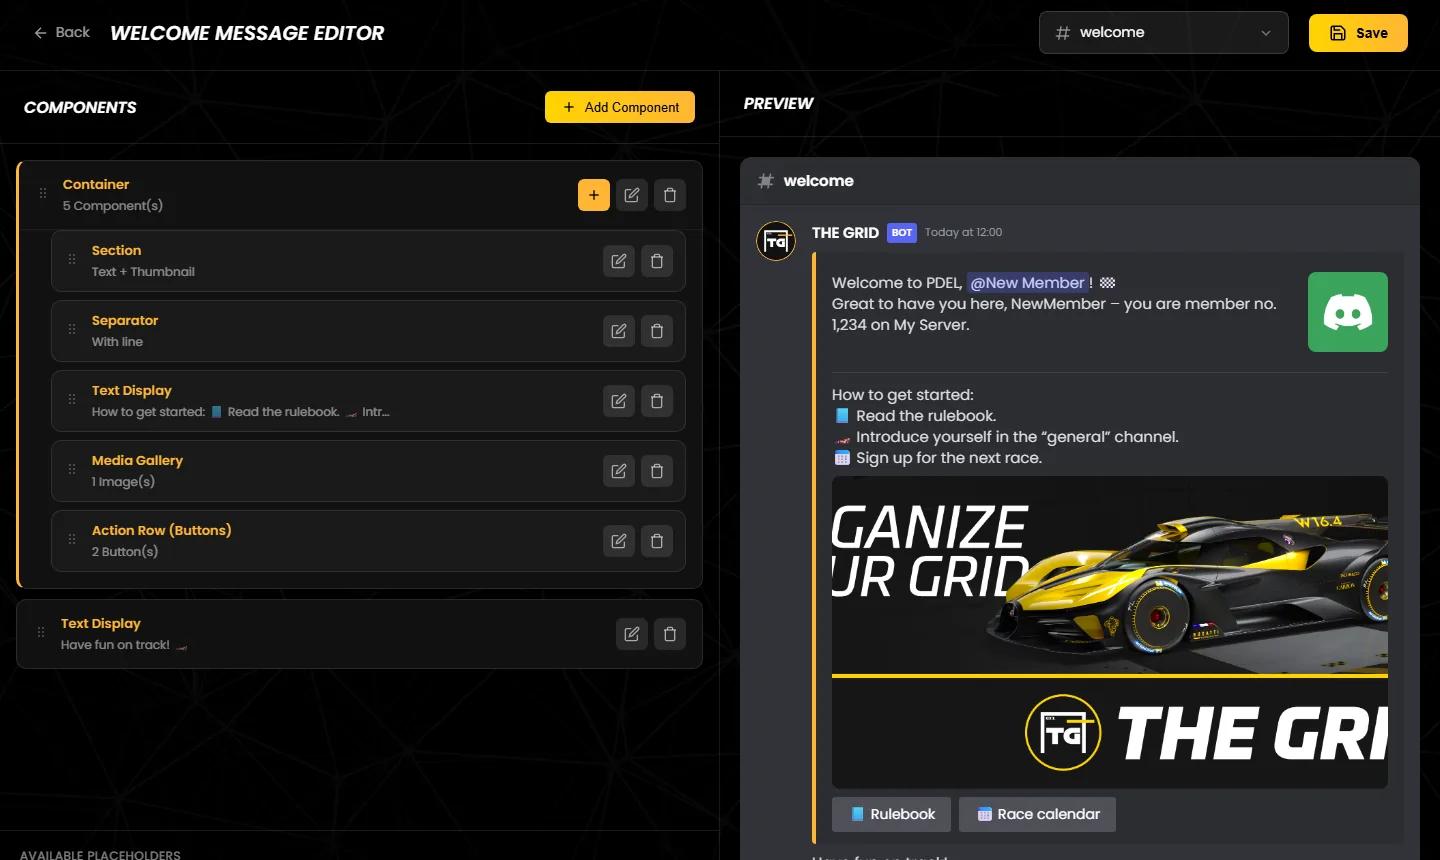
The preview helps while designing, but it does not show everything the way Discord does:
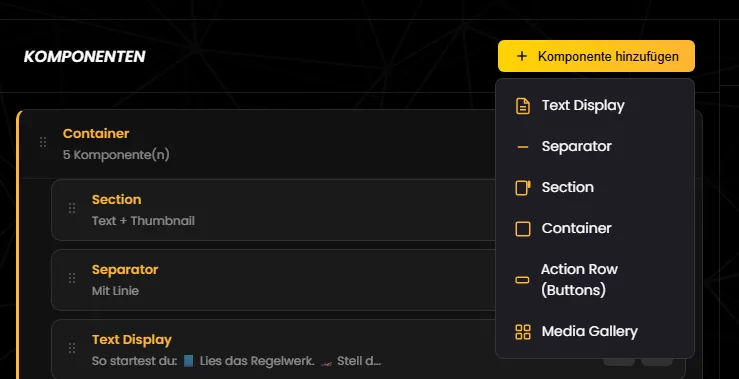
**bold** appears raw. In Discord the text is formatted.{userAvatar} in a text appears as a small image – in Discord it is just a link.Sechs Bausteine stehen zur Wahl. Du kannst sie frei kombinieren und mehrfach verwenden.
| Baustein | Einstellungen im Dialog | Regeln und Grenzen |
|---|---|---|
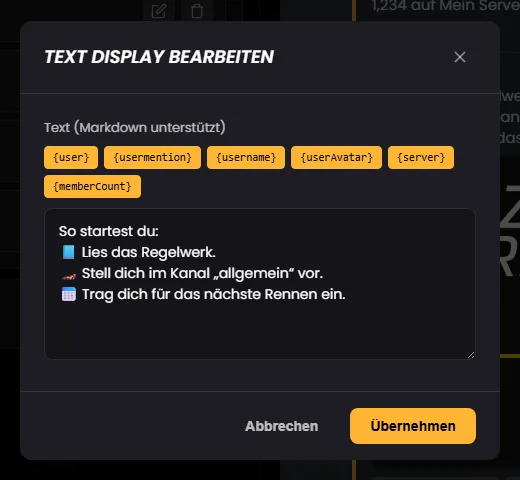
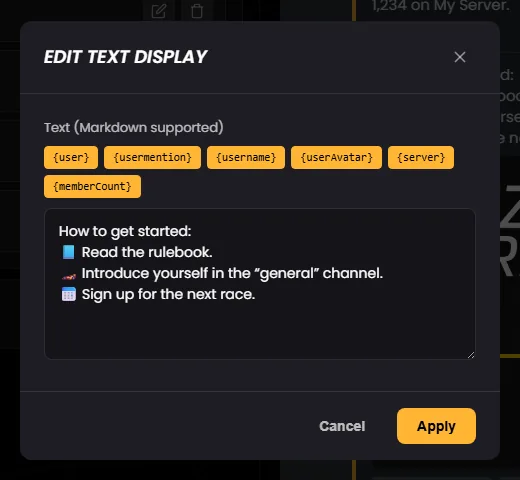
| Text Display | „Text (Markdown unterstützt)“ mit den sechs Platzhaltern als Knöpfe – ein Klick fügt sie an der Schreibmarke ein. Neu angelegt steht dort „Willkommen {user}! 👋“, in einem Container „Neuer Text“. | Darf nicht leer sein und höchstens 4000 Zeichen haben – gezählt nach dem Einsetzen der Platzhalter. Markdown wie **fett** oder *kursiv* zeigt Discord formatiert. |
| Separator | „Trennlinie anzeigen“ – neu angelegt an. | Nur Linie an oder aus. Der Abstand ist immer klein und lässt sich nicht einstellen. |
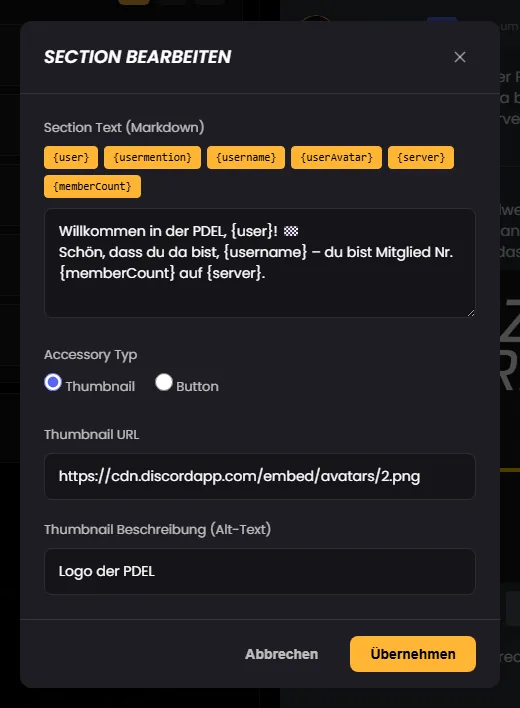
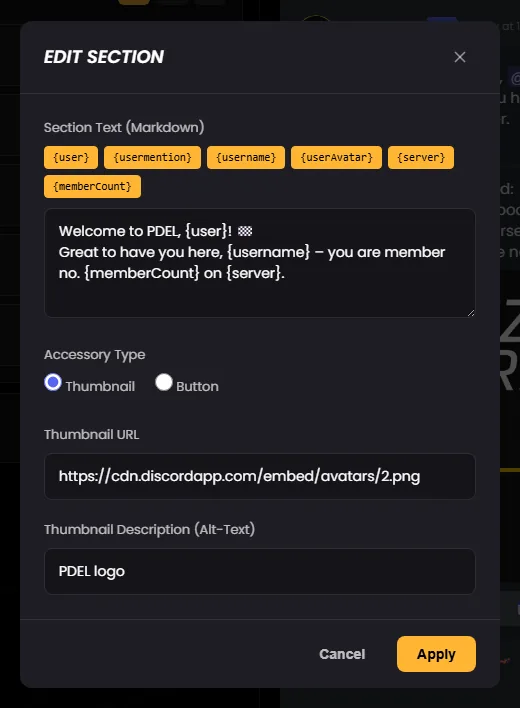
| Section | „Section Text (Markdown)“ mit Platzhalter-Knöpfen und „Accessory Typ“: „Thumbnail“ oder „Button“. Bei „Thumbnail“: „Thumbnail URL“ und „Thumbnail Beschreibung (Alt-Text)“. Bei „Button“: „Button Label“ und „Button URL“. Neu angelegt: Text „Section Text“ mit dem Discord-Standardbild. | Text 1–4000 Zeichen. Bild oder Button ist Pflicht. Bildadresse mit http:// oder https://, Beschreibung höchstens 1024 Zeichen. Button-Text 1–80 Zeichen, Adresse mit http://, https:// oder discord://. |
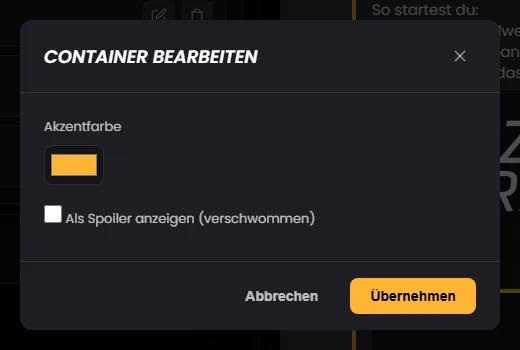
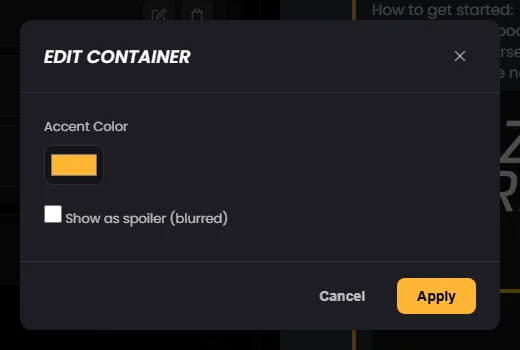
| Container | „Akzentfarbe“ (Farbwähler) und „Als Spoiler anzeigen (verschwommen)“ derzeit ohne Wirkung. Inhalte fügst du mit dem „+“ an seiner Zeile hinzu. Neu angelegt: gelber Balken mit dem Text „Container Inhalt“. | Rahmen mit farbigem Balken links. Darf Text Display, Separator, Section, Action Row und Media Gallery enthalten – aber keinen weiteren Container. |
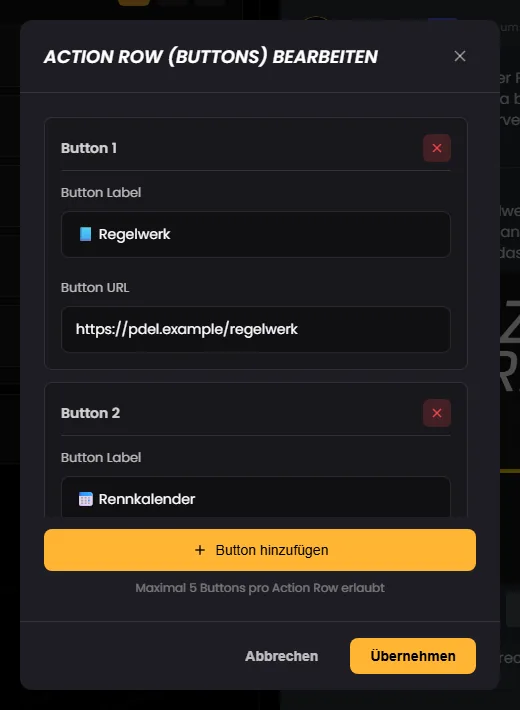
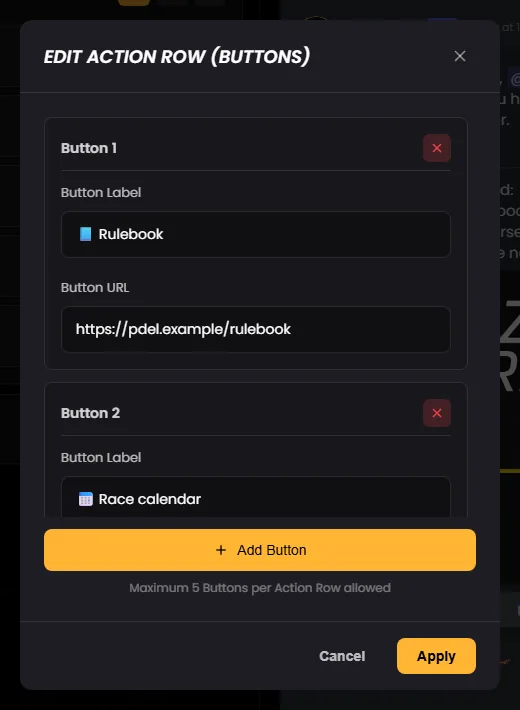
| Action Row (Buttons) | Je Button „Button Label“ und „Button URL“, dazu „Button hinzufügen“. Neu angelegt: ein Button „Button“ mit https://example.com. | Höchstens 5 Buttons pro Reihe – für mehr legst du eine zweite Action Row an. Button-Text 1–80 Zeichen, Adresse mit http://, https:// oder discord://. Buttons ohne Text oder Adresse fallen beim „Übernehmen“ weg. Den letzten Button einer Reihe kannst du nicht entfernen – lösche dann die ganze Action Row. |
| Media Gallery | Je Bild „Bild URL“, „Beschreibung (Alt-Text)“ und „Als Spoiler anzeigen“, dazu „Bild hinzufügen“. Neu angelegt: ein Bild (das Discord-Standardbild). | Höchstens 10 Bilder. Adresse mit http:// oder https://, Beschreibung höchstens 1024 Zeichen. Bilder ohne Adresse fallen beim „Übernehmen“ weg. Der Spoiler wirkt hier: Discord zeigt das Bild als Spoiler. |
Eine Section braucht immer ein Bild oder einen Button. Lässt du die „Thumbnail URL“ leer oder fehlen beim Button Text oder Adresse, entfernt der Editor das Zubehör. Discord verlangt es aber – dann sendet der Bot die gesamte Begrüßung nicht.
„Als Spoiler anzeigen (verschwommen)“ am Container derzeit ohne Wirkung – der Container wird immer unverschwommen gesendet. Bei den Bildern einer Media Gallery wirkt die Option.
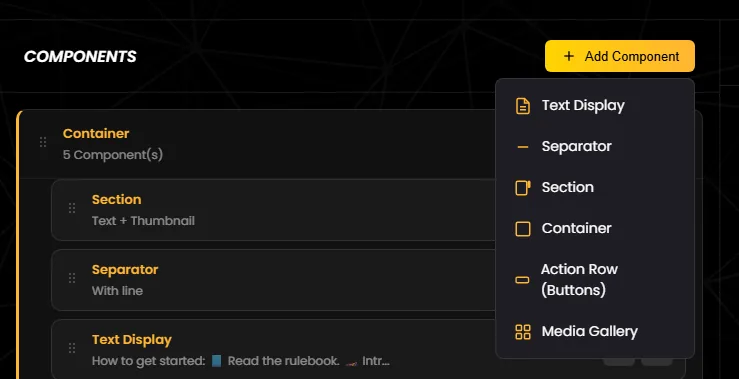
Six blocks are available. You can combine them freely and use each of them several times.
| Block | Settings in the dialog | Rules and limits |
|---|---|---|
| Text Display | “Text (Markdown supported)” with the six placeholders as buttons – a click inserts them at the cursor. A new block contains “Welcome {user}! 👋”, inside a container “New Text”. | Must not be empty and may have at most 4,000 characters – counted after the placeholders are filled in. Discord shows Markdown such as **bold** or *italic* formatted. |
| Separator | “Show divider line” – on for a new block. | Only line on or off. The spacing is always small and cannot be changed. |
| Section | “Section Text (Markdown)” with placeholder buttons and “Accessory Type”: “Thumbnail” or “Button”. With “Thumbnail”: “Thumbnail URL” and “Thumbnail Description (Alt-Text)”. With “Button”: “Button Label” and “Button URL”. New block: the text “Section Text” with Discord's default image. | Text 1–4,000 characters. An image or a button is required. Image address with http:// or https://, description at most 1,024 characters. Button text 1–80 characters, address with http://, https:// or discord://. |
| Container | “Accent Color” (colour picker) and “Show as spoiler (blurred)” currently has no effect. Add content with the “+” on its row. New block: yellow bar with the text “Container Content”. | Frame with a coloured bar on the left. May contain Text Display, Separator, Section, Action Row and Media Gallery – but no other container. |
| Action Row (Buttons) | “Button Label” and “Button URL” for each button, plus “Add Button”. New block: one button “Button” pointing to https://example.com. | At most 5 buttons per row – for more, add a second action row. Button text 1–80 characters, address with http://, https:// or discord://. Buttons without text or address are dropped when you click “Apply”. You cannot remove the last button of a row – delete the whole action row instead. |
| Media Gallery | “Image URL”, “Description (Alt-Text)” and “Show as spoiler” for each image, plus “Add Image”. New block: one image (Discord's default image). | At most 10 images. Address with http:// or https://, description at most 1,024 characters. Images without an address are dropped when you click “Apply”. The spoiler works here: Discord shows the image as a spoiler. |
A section always needs an image or a button. If you leave the “Thumbnail URL” empty, or the button has no text or address, the editor removes the accessory. Discord requires it, though – so the bot does not send the welcome message at all.
“Show as spoiler (blurred)” on a container currently has no effect – the container is always sent unblurred. For the images of a media gallery, the option works.
Platzhalter ersetzt der Bot beim Senden durch die Daten des neuen Mitglieds und deines Servers. In den Dialogen „Text Display“ und „Section“ fügst du sie per Klick ein; der Kasten „Verfügbare Platzhalter“ im Editor kopiert sie in die Zwischenablage.
| Platzhalter | Wird zu | Beispiel |
|---|---|---|
{user} | Erwähnung des neuen Mitglieds – anklickbar, zeigt den Anzeigenamen | @Lena |
{usermention} | genau dasselbe wie {user} | @Lena |
{username} | Discord-Benutzername – der eindeutige Name des Kontos, nicht der Anzeigename und nicht der Spitzname auf dem Server | lena_drift |
{userAvatar} | Adresse des Profilbilds in 256 Pixeln – das allgemeine Profilbild des Kontos, ohne eigenes Bild das Discord-Standardbild | https://cdn.discordapp.com/avatars/… |
{server} | Name des Servers | PDEL |
{memberCount} | Mitgliederzahl, einschließlich des neuen Mitglieds und aller Bots, ohne Tausendertrennzeichen | 413 |
{memberCount} funktioniert, {membercount} nicht – ebenso bei {userAvatar}. Falsch geschriebene Platzhalter stehen als Text in der Nachricht.Profilbild des neuen Mitglieds zeigen: Trage bei einer Section als „Thumbnail URL“ {userAvatar} ein. Für Adressfelder gibt es keine Platzhalter-Knöpfe – tippe ihn einfach ein. Die Vorschau zeigt dort ein kaputtes Bild, in Discord erscheint das Profilbild.
The bot replaces placeholders with the details of the new member and your server when it sends the message. In the “Text Display” and “Section” dialogs you insert them with a click; the “Available Placeholders” box in the editor copies them to the clipboard.
| Placeholder | Becomes | Example |
|---|---|---|
{user} | Mention of the new member – clickable, shows the display name | @Lena |
{usermention} | exactly the same as {user} | @Lena |
{username} | Discord username – the unique name of the account, not the display name and not the nickname on the server | lena_drift |
{userAvatar} | Address of the profile picture at 256 pixels – the account's general profile picture, or Discord's default image if there is none | https://cdn.discordapp.com/avatars/… |
{server} | Server name | PDEL |
{memberCount} | Member count, including the new member and all bots, without a thousands separator | 413 |
{memberCount} works, {membercount} does not – the same goes for {userAvatar}. Misspelled placeholders appear as plain text in the message.Show the new member's profile picture: enter {userAvatar} as the “Thumbnail URL” of a section. Address fields have no placeholder buttons – just type it in. The preview shows a broken image there; in Discord the profile picture appears.
So sieht die Begrüßung aus dem Editor-Beispiel in Discord aus, wenn Lena dem Server beitritt:
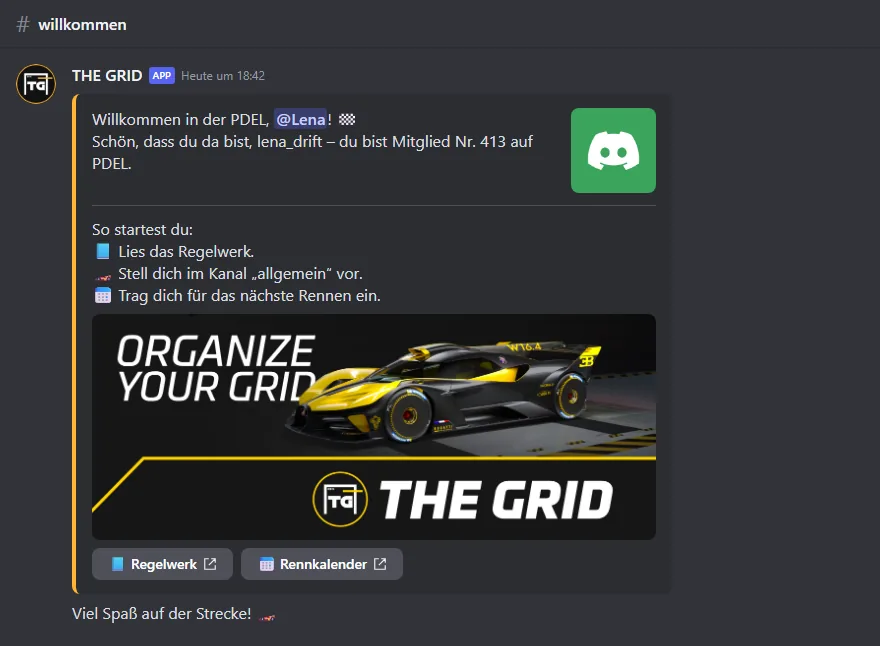
{user} wurde zu @Lena, {username} zu lena_drift, {memberCount} zu 413 und {server} zu PDEL.This is what the welcome message from the editor example looks like in Discord when Lena joins the server:
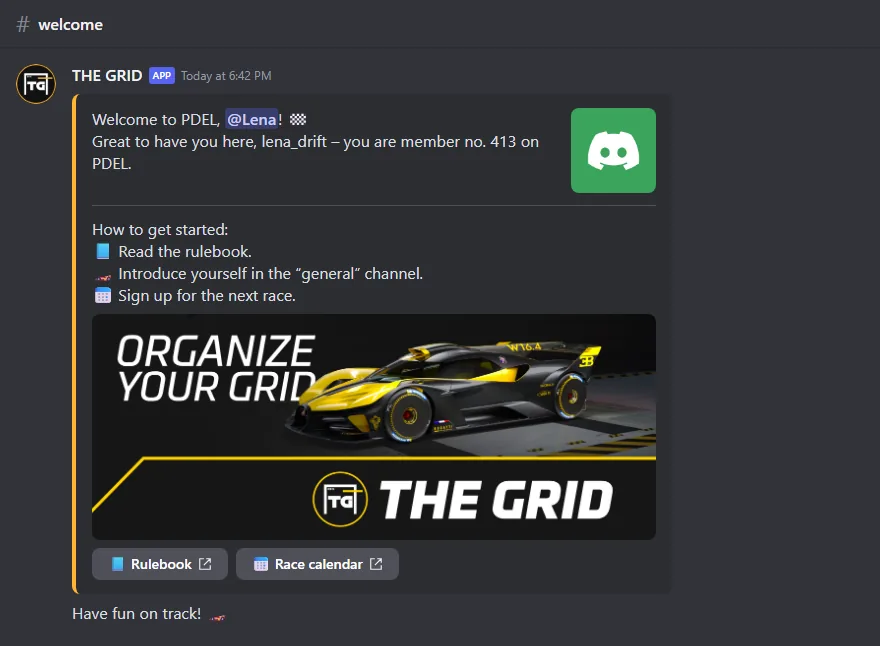
{user} became @Lena, {username} lena_drift, {memberCount} 413 and {server} PDEL.Welcome Setup bearbeiten können nur der Server-Besitzer und Mitglieder mit der Discord-Berechtigung „Administrator“. „Server verwalten“ reicht nicht. Ohne diese Berechtigung zeigt die Seite „Fehler beim Laden“ mit dem Hinweis „Access denied: admin permissions required“. Mehr dazu unter Voraussetzungen.
| Berechtigung | Wofür |
|---|---|
| Kanal ansehen | Unbedingt nötig – sonst findet der Bot den Kanal nicht. |
| Nachrichten senden | Unbedingt nötig – sonst kommt keine Begrüßung an. |
| Links einbetten | Verlangt die Prüfung im Dashboard. |
| Dateien anhängen | Verlangt die Prüfung im Dashboard. Der Bot selbst hängt keine Dateien an. |
Erteile am besten alle vier – dann ist die Prüfung grün. Hat der Bot die Berechtigung „Administrator“, gelten alle Rechte als erteilt; sonst zählen die Rechte seiner Rollen und die Berechtigungen von Kategorie und Kanal. Nutzt du im Text Emojis eines anderen Servers, kann der Bot zusätzlich „Externe Emojis verwenden“ brauchen.
Only the server owner and members with the Discord permission “Administrator” can edit Welcome Setup. “Manage Server” is not enough. Without that permission, the page shows “Error loading” with the note “Access denied: admin permissions required”. More under Requirements.
| Permission | What for |
|---|---|
| View Channel | Strictly required – otherwise the bot cannot find the channel. |
| Send Messages | Strictly required – otherwise no welcome message arrives. |
| Embed Links | Required by the dashboard check. |
| Attach Files | Required by the dashboard check. The bot itself does not attach any files. |
It is best to grant all four – then the check turns green. If the bot has the “Administrator” permission, all permissions count as granted; otherwise the permissions of its roles and the overrides of the category and the channel apply. If you use emojis from another server in your text, the bot may also need “Use External Emojis”.
Tritt ein Bot deinem Server bei, bekommt auch er eine Begrüßung. Anders als Auto Roles macht Welcome Setup keine Ausnahme für Bots.
Wer den Server verlässt und wieder beitritt, wird erneut begrüßt. Frühere Begrüßungen bleiben im Kanal stehen.
Die Begrüßung erscheint nur im Willkommenskanal. Eine Direktnachricht an das neue Mitglied schickt Welcome Setup nicht.
Ist ein einziger Baustein ungültig, sendet der Bot gar nichts: etwa ein leerer Text, eine Section ohne Bild oder Button, eine Adresse ohne http:// bzw. https://, ein Button-Text über 80 oder ein Alt-Text über 1024 Zeichen. Das Dashboard zeigt dabei keinen Fehler.
Eine Testnachricht lässt sich nicht auslösen. Teste mit einem zweiten Discord-Konto: Server verlassen und neu beitreten – am besten nach jeder Änderung.
Treten Mitglieder bei, während der Bot offline ist, holt er ihre Begrüßung später nicht nach.
Die Begrüßung kommt sofort – auch wenn das neue Mitglied die Serverregeln noch nicht bestätigt hat.
Der Bot sendet genau das, was du gestaltest – eigene Texte fügt er nicht hinzu, die Serversprache spielt keine Rolle. Nur der Vorschlag in einem neuen Text Display richtet sich nach der Dashboard-Sprache: „Willkommen {user}! 👋“ oder „Welcome {user}! 👋“.
If a bot joins your server, it gets a welcome message as well. Unlike Auto Roles, Welcome Setup makes no exception for bots.
Anyone who leaves the server and joins again is greeted again. Earlier welcome messages stay in the channel.
The welcome message only appears in the welcome channel. Welcome Setup does not send a direct message to the new member.
If a single block is invalid, the bot sends nothing at all: for example an empty text, a section without an image or button, an address without http:// or https://, a button text over 80 or an alt text over 1,024 characters. The dashboard shows no error.
You cannot trigger a test message. Test with a second Discord account: leave the server and join again – ideally after every change.
If members join while the bot is offline, it does not send their welcome message later.
The welcome message arrives immediately – even if the new member has not yet accepted the server rules.
The bot sends exactly what you design – it adds no texts of its own, and the server language does not matter. Only the suggestion in a new Text Display follows the dashboard language: “Welcome {user}! 👋” or “Willkommen {user}! 👋”.
Diese Fehler sind bekannt. Bis sie behoben sind, helfen die beschriebenen Umwege.
Das × trifft den falschen Eintrag: In den Dialogen „Action Row (Buttons)“ und „Media Gallery“ kann nach dem ersten Entfernen das nächste × einen anderen Eintrag löschen als gedacht – oder gar keinen. Umweg: Entferne pro Durchgang nur einen Eintrag, schließe den Dialog mit „Übernehmen“ und öffne ihn neu.
Gerade Anführungszeichen schneiden Text ab: Steht ein gerades Anführungszeichen (") in einem Button-Text, einer Adresse oder einer Beschreibung (Section, Action Row, Media Gallery), fehlt beim nächsten Öffnen des Dialogs alles ab diesem Zeichen – nach „Übernehmen“ ist dann der gekürzte Text gespeichert. Umweg: Nimm typografische Anführungszeichen „…“.
Unverständliche Meldung beim Speichern: Schlägt das Speichern fehl, zeigt der Browser ein Fenster mit „welcome-editor.error.saveFailed“. Das heißt: Deine Änderungen sind nicht gespeichert. Umweg: Lass den Editor geöffnet und klicke noch einmal auf „Speichern“. Klappt es weiterhin nicht, prüfe in einem zweiten Browser-Tab, ob du im Dashboard noch angemeldet bist, und speichere danach erneut.
Gelöschter Kanal erscheint als „Nicht konfiguriert“: Wurde der Willkommenskanal in Discord gelöscht, zeigt die Welcome-Setup-Seite „Nicht konfiguriert“, das Banner meldet „Channel existiert nicht mehr“. Der Editor hält den alten Kanal aber unsichtbar fest und speichert ihn bei jedem „Speichern“ erneut. Umweg: Wähle im Editor einen neuen Kanal und klicke auf „Speichern“.
Editor startet leer: Kann der Editor deine gespeicherte Begrüßung nicht laden, startet er ohne Meldung leer. Umweg: Speichere dann nicht – sonst ersetzt du die gespeicherte Begrüßung durch eine leere –, sondern lade die Seite neu.
Weitere Antworten findest du unter Hilfe & FAQ.
These issues are known. Until they are fixed, the workarounds described here help.
The × hits the wrong entry: in the “Edit Action Row (Buttons)” and “Edit Media Gallery” dialogs, after the first removal the next × may delete a different entry than intended – or none at all. Workaround: remove only one entry at a time, close the dialog with “Apply” and open it again.
Straight quotes cut text off: if a button text, an address or a description (section, action row, media gallery) contains a straight quotation mark ("), everything from that character onwards is missing the next time you open the dialog – after “Apply” the shortened text is what gets saved. Workaround: use typographic quotation marks “…”.
Cryptic message when saving: if saving fails, your browser shows a window with “welcome-editor.error.saveFailed”. It means: your changes have not been saved. Workaround: keep the editor open and click “Save” again. If it still fails, check in a second browser tab whether you are still logged in to the dashboard, then save again.
Deleted channel shows as “Not configured”: if the welcome channel was deleted in Discord, the Welcome Setup page shows “Not configured” and the banner reports “Channel existiert nicht mehr” (channel no longer exists). The editor, however, keeps the old channel invisibly and saves it again with every “Save”. Workaround: choose a new channel in the editor and click “Save”.
Editor starts empty: if the editor cannot load your saved welcome message, it starts empty without any message. Workaround: do not save then – you would replace the saved welcome message with an empty one – but reload the page.
You will find more answers under Help & FAQ.
Tritt unserem Discord-Server bei – das Team hilft dir bei der Einrichtung gerne weiter.
Join our Discord server – the team is happy to help you with the setup.